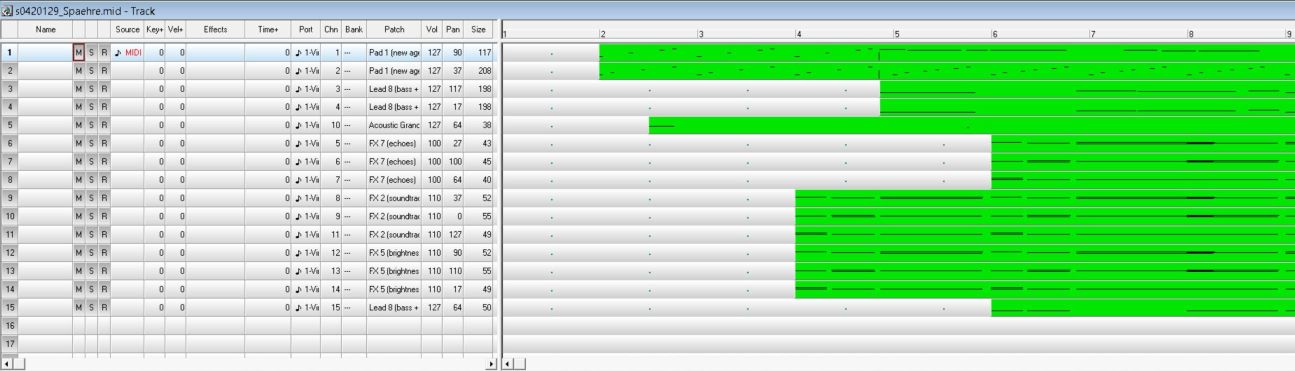
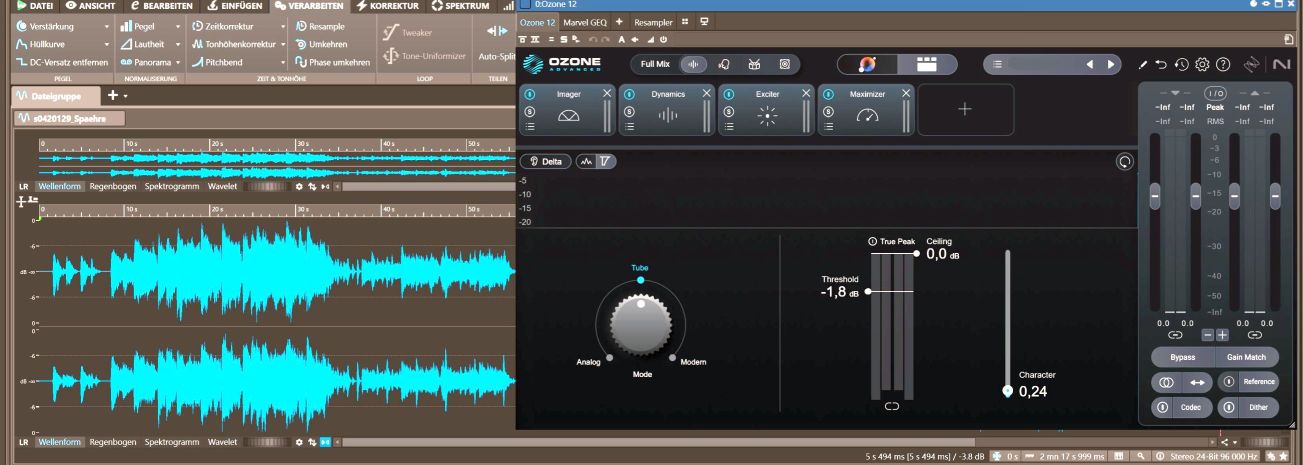
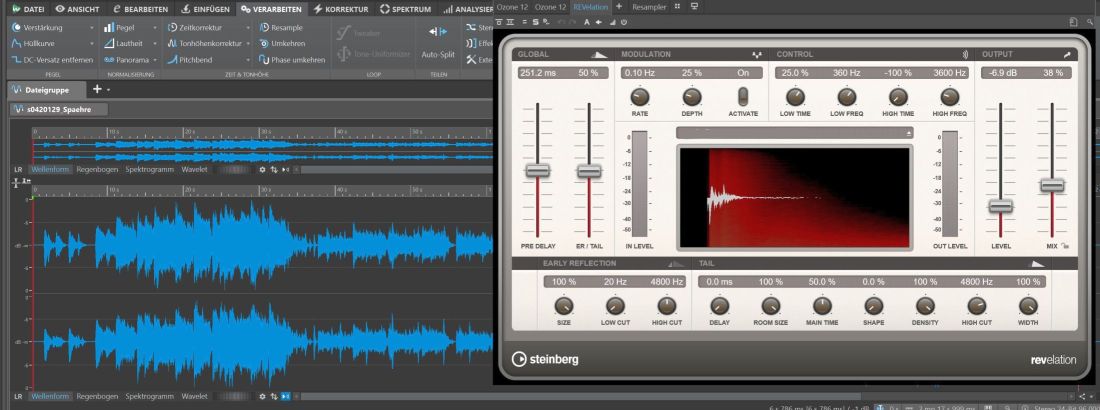
Audio MIDI - MIDI elements and their handling in a MIDI sequencer
It is demonstrated how to work with MIDI data in a MIDI sequencer.
The goal is to become familiar with the fundamental capabilities.
Knowledge of music notation is not strictly required.
Website - Basic selection
_________________________________________________________________________________________________________________________________
_________________________________________________________________________________________________________________________________
Trained in Making Music with MIDI
Making music with MIDI is excellent for training the following skills:
Auditory perception regarding pitch and deviations-for instance, by a semitone.
Auditory perception regarding nuances in tempo.
Auditory perception regarding the combination of instruments and the resulting sonic variations.
The development of musical taste based on the content of the music, rather than solely on its structural layout.
MIDI offers a path to escape complacency by fostering independent creativity and strengthening both body and soul. However, this path entails
effort-effort that yields the capacity for informed musical consumption as its ultimate result. In the process, one also acquires the ability
to successfully access other realms of culture through the medium of music-thereby unlocking the vast majority of artistic diversity.
Consequently, a narrow existence of the mind and intellect-along with the susceptibility to standardization for the purpose of externally
imposed exploitation-falls away
Example of human hearing:
heise.de April 5, 2012, 10:06 AM
Algorithm Tunes Pianos
Despite advancing automation, there are still skills in which humans significantly outperform computers.
One of these is piano tuning. The reason: The human ear perceives frequencies differently than a sensor does-
and appears to operate with greater precision in doing so. Consequently, attempts to tune pianos mechanically
have consistently yielded unsatisfactory results. Würzburg-based physicist Haye Hinrichsen has now developed a
concept that could threaten the traditional stronghold of piano tuners: so-called "entropy-based tuning," as
reported by *Technology Review* in its online edition.
Hinrichsen's approach mathematically formalizes the qualities that define a skilled piano tuner: The human
ear compares not only the fundamental tones of two musical notes separated by an octave, but also their overtones.
However, due to the logarithmic increase in frequency, these overtones do not always align as precisely with one
another as the fundamental frequencies do. This results in a phenomenon known as "beating": The frequency ratio of
two overtones deviates ever so slightly from the "correct" value. The piano tuner attempts to minimize this
deviation-until reaching the point where the inner ear can no longer resolve the two distinct frequencies.
In his method, Hinrichsen first tunes a piano using equal temperament. He then divides the audio frequency
spectrum into intervals that the inner ear is just barely able to resolve. This is where Shannon entropy comes
into play; serving as a measure of the information content of a symbol or symbol system, Shannon entropy-specifically
regarding two spectral lines or adjacent frequencies-decreases as their overlap increases. The process begins by
calculating the total entropy for a series of tones. Subsequently, the frequencies of individual overtones are
varied at random. If the newly calculated Shannon entropy is lower than before, the altered tones are closer to
a correct tuning than before.
Additional Notes:
The Well-Tempered Clavier (e.g., Bach) has now been mathematically modeled-an algorithm tunes the piano.
The algorithm describes the process of achieving a well-tempered piano tuning as performed by a professional tuner:
The human ear compares fundamental tones and overtones. Neither of these tonal components can be described as following an
exactly logarithmic progression in terms of frequency; consequently, a stochastic element is incorporated. Since frequency
deviations eventually become too minute for the piano tuner's ear to detect, the objective is to reach the specific state
where this initial imperceptible deviation occurs-this is precisely what the tuner achieves when rendering the piano
"well-tempered." Within the algorithm, the frequencies of individual overtones are varied randomly until the correct,
well-tempered tuning is established. As a result, the role of the professional piano tuner could be rendered obsolete.
An analogue to the tempering of musical instruments is quantization in the realm of MIDI-generated music. When using a note
sequencer-which generates tones via software commands sent to a sound card-the rhythmic timing is, from a hardware perspective,
set with excessive precision. Over time, the human ear perceives such exact, unvarying timing as highly irksome. Consequently,
rhythmic dynamics must be actively created-a process achieved through quantization, which involves aligning these precisely
pitched notes to subtle, minute fluctuations in tempo. This form of quantization is frequently superseded by the manual setting
of tempo parameters within the sequencer. Tempo serves as a vital tool for musical dramaturgy and interpretation. Today, MIDI
has largely given way to pattern-oriented music production. Instead of individual notes, sequences of sounds are now chained
together-a practice that constitutes a significant portion of the commercially ubiquitous pop music found on the market: a
form of imitative music production characterized by uniform design and the standardization of consumer tastes. The fact that
MIDI-with its 16 mono channels and 128 distinct instruments available per channel-offers vastly greater sonic diversity
(effectively providing a "16.1 surround sound" experience that even cinema audio systems rarely achieve) is ultimately deemed
irrelevant; for the creative effort inherent in MIDI-based music production-much like that involved in the precise tempering
of a piano-cannot always be subjected to standardized optimization, as its true objective lies in the inherent quality of the
music and the tones themselves.
_________________________________________________________________________________________________________________________________
_________________________________________________________________________________________________________________________________
Requirements
0. Computer
MIDI itself runs perfectly well even on computers from the Pentium III generation with a 200 MHz CPU.
The computer's sound card requires additional CPU resources only when working with VSTis or large soundfonts
that must provide data in real time.
Digital Audio Workstations (DAWs) often feature comprehensive audio integration-such as pattern processing-which
naturally demands significant CPU power.
A computer capable of running Windows 9x is sufficient for sequencer software specialized in MIDI, as audio
integration within a MIDI environment has nothing to do with MIDI itself.
Different conditions apply to the production of MIDI data without a MIDI-capable sound card - here is an example:
Computer with Windows 11 pro 64 bit
CPU Intel Core i9-13900KF processor (36 MB cache, 3.0 up to 5.80 GHz) 24 cores, 32 threads, 36 MB cache
Motherboard MSI with chipset Z690, 4 RAM slots, max. 128 GB RAM, PCIe GEN4x4 NVMe
RAM DDR5, 2x16 GB, 4800 MHz
Graphics card GeForce RTX 4070 Ti VENTUS 3X 12G OC, 12GB RAM, GDDR6X
HDD SSD with 1TB internal, PCIe GEN4x4 NVMe
These high hardware Requirements are necessary in order to be able to process SF2 banks in real time by the CPU,
so that the MIDI data is rendered (sampled) as audio in real time.
If you also want to use VSTi, i.e. virtual instruments, you have to spend tens of gigabytes, depending on the
sound databases can include, have plenty of CPU power. In connection with graphics processing, the following is
worthwhile Workstation - an example:
Computer with Windows 11 pro 64 bit
CPU Intel Core i9-14900K, 8x 3.20GHz + 16x 2.20 GHz, 36MB L3 cache
Motherboard ASUS Z790 Maximus Formula | Intel Z790
RAM 96GB Corsair Dominator Titanium RGB DDR5-6400 | 2x 48GB - white
Graphics card NVIDIA GeForce RTX 4090 24GB | MSI Gaming X Trio
HDD SSD (M.2 / PCIe) 2TB Samsung 990 PRO PCIe 4.0 | read up to 7,450 MB/s
Using Apple technology can be a dead end as the removal and conversion of the
Computers are often blocked: it's best to always buy new ones...
In addition, for further processing of the sampled data (e.g. as 24 bit, 96 kHz (AVCHD format for
Blu-Ray supports a maximum of PCM with 24 bit and 96 kHz) e.g. sophisticated software can be used for Surround 7.1,
which is not freeware: E.g. Yamaha Steinberg Wavelab Pro 13 64 bit, Izotope 12 Pro 64 bit, BorisFX Sound Forge pro 64 bit
and possibly Yamaha Steinberg Cubase Pro 64 Bit.
There is no freeware that reaches the necessary level. Experiments with freeware are not worth it - except for 1
Exception (see sound card).
1. Sound card
The sound card used must support MIDI SoundFonts.
For instance, Java-based MIDI SoundFont support is not acceptable.
Sound cards from Creative Labs are acceptable and recommended, provided they include a SoundFont (SF2) that renders
MIDI instruments so effectively that any subsequent post-processing of the sound wave-table file becomes unnecessary.
e.g., the Creative Labs Audigy SB 0090 (Audigy I), which includes 5.1 analog audio output.
In an earlier model-the AWE 64-the SoundFont was actually integrated via a RAM module, enabling the sound card to
operate entirely autonomously. However, RAM modules did not gain widespread traction within the hobbyist sector.
Special conditions apply to the production of MIDI data without a MIDI-capable sound card - see Computer.
If a non-MIDI-capable sound card is to be used, the MIDI data must be sampled in real time.
In addition to appropriate CPU performance, this also requires an interface between the operating system and MIDI
sampling sound card. So the operating system has to send the sound font data in real time from MIDI to the
Sound card, which then samples in real time. For this purpose there is a plugin for that
Operating system required. This plug-in must also allow sampled data to be displayed in real time, if possible
Audio processing software can be forwarded.
Creative Labs is considered a pioneer in the sound card sector that produces excellent sound cards,
which is well known in the area of SF2 and MIDI and personal computers. Than very
For a good USB sound card, we recommend the Creative Labs SBX-4 externally, which however has one
USB-C interface is required, which in addition to the power supply also provides 10 plaster, because the
SBX-4 has to sample in real time. - Of course you can also use the SBX-4 with effects
the sound card already supplies, sampling: tradition at Creative Labs (What You Hear).
The SBX-4 supports Surround 7.1, but NO sound fonts as a database in the memory
Device - Creative Labs also said goodbye to it a long time ago.
As a plug-in for the operating system, there is exactly 1 provider that only offers this plug-in as a donation product
for Windows. Unfortunately, the manufacturer does not allow donations via Paypal and is closing with that
a wide circle of interested parties.
The provider and manufacturer is coolsoft.altervista.org/en/virtualmidisynth
This provider is the “Swiss knife” in its field. and a basic software,
which should actually have been integrated into the operating system long ago. Virtual MIDI Synth.
is basic software e.g. the Irfanview graphics program or the Vice Versa backup program.
Virtual MIDI Synth. As a driver, it can be addressed directly as a MIDI device: it simulates a real MIDI device
for MIDI data processing. The driver can load a soundfont and process it in real time if
the CPU in the computer has enough power. The size of the sound font also depends on the RAM
of the computer. Multiple sound fonts can be loaded, of which only 1 font can be active,
but the font selection is just a click of the mouse.
The soundfont driver is inherently polyphonic, so that a MIDI track, for example, only
Can operate 1 instrument at any time, but with several voices at the same time
in the common track. So General MIDI is supported.
The driver has a graphic user interface (GUI), for example a mixer add-on.
The driver is also 64 bit.
The real highlight of Virtual MIDI Synth. However, that is MIDI processing
is also possible on highly modern computers, for which there are excellent sound cards
(on the motherboard) but they don't support MIDI. The manufacturer of the driver
So save the ancient world of sound fonts into the present and do it with it
the use of MIDI data by modern products such as Steinberg products from Yamaha
only possible.
That Yamaha is on Virtual MIDI Synth. didn't cast an eye is significant
for the loss of an old tradition at Yamaha, also in the keyboard area
Yamaha has said goodbye to sound fonts because Yamaha uses MIDI commands, among other things
Sound snippets can be processed using frequency modulation, so that's it
Instruments can be modeled with the most realistic sound possible - and through the
Keyboard players are also changeable (Yamaha has one with its Montage M8X
Flagship on the market) .... Unfortunately without General MIDI sound font banks,
the principle of which Yamaha invented. ...But Virtual MIDI Synth. helps with devices,
which can at least process sampled sound fonts (Korg has with his
Pa5X is a flagship on the market that knows SF2).
2. MIDI Sequencer
In principle, any MIDI sequencer can be used. However, virtually all MIDI sequencers operate at the level of piano-roll
notation-and are thus far removed from any meaningful MIDI processing capabilities.
Strictly speaking, there is only one manufacturer that produced MIDI sequencers of this caliber-and did so a long time ago:
Cakewalk, with "Cakewalk Audio Pro" (released in 1999), or alternatively, Cakewalk with "Sonar".
The remaining MIDI sequencers currently on the market are largely pointless if one is concerned *solely* with the
pure-and, above all, high-quality-creation of MIDI data.
The MIDI sequencer used must possess, among other things, the following capabilities-some of which are explained in detail below:
The sound card's MIDI output port must be usable as the sound card's MIDI synth port.
Examples of unacceptable interfaces include the Synthfont soundfont interface and Microsoft's MIDI interface.
The Linux interface is considerably-even dauntingly-more complex if Linux does not directly support the sound
card's synth port.
The sound card's MIDI port directly activates the card's internal soundfont wavetable, meaning that this specific
hardware is solely responsible for generating the audio signal in real time, utilizing the wave snippets contained
within the soundfont. The signal can then be directly sampled by recording software (e.g., into a WAV file), with
the signal level adjustable via a MIDI synth mixer slider-which is also displayed within the recording
software-to prevent distortion.
Undoing of editing steps (Undo) even after saving the MIDI file.
There are programs that clear the undo cache upon saving a file-a practice that constitutes a tremendous inconvenience.
Saving MIDI data in versions (by modifying the filename) has absolutely nothing to do with the undo cache; therefore,
the undo cache must not be cleared when saving data.
Cleanup of MIDI files to remove duplicate notes and events that occur at the same position for the same instrument
(optionally, all such notes within a specific range surrounding the shared position).
e.g.:
C3 1:00:00
C3 1:00:03
C3 1:00:00
C3 appears twice at the exact same position-rendering it pointless.
The sequencer must be able to remove this error using a filter.
Cakewalk, with "Cakewalk Audio Pro," features its own scripting language that allows for filtering..
Naturally, the removal of duplicate notes and events must function across tracks.
Graphical and numerical insertion of tempi (with resolution zoom).
Playback tempo is a fundamental aspect of artistic interpretation. The minimum tempo in MIDI is extremely low, as
MIDI operates in real time. Various MIDI editors offer a note display mode-for instance, allowing for 64th notes.
However, MIDI allows for the setting of significantly finer note resolutions by utilizing the sequencer's tempo
window (rather than relying on the standard note display). These resolution values are so minute that it becomes
necessary to "draw" the tempo using a line or curve (a "tempo curve") in order to freely apply tempo variations
across larger sections. A MIDI sequencer incapable of this functionality is utterly worthless. See also: Shifting
notes and events by bar units.
Shifting notes and events to the left or right by bar units or ticks.
"Sliding"-that is, shifting material along the timeline-is essential for purposes such as ensuring that tracks or audio
segments begin at a shared point in time. Furthermore, it is important to note that MIDI interacts with hardware in real
time-meaning with a high degree of precision-and applies this exactitude across all notes and their durations, which
remain invariable. A pianist, however, can never sustain every note for the exact duration prescribed by the musical
score; consequently, the tempo itself fluctuates indirectly. A seasoned musician or listener will, in the literal sense
of the word, get a headache upon hearing the rigid, exact playback of MIDI hardware; the absence of that characteristic
"pianistic imperfection" is immensely jarring. Thus, alongside the "slide" function, tempo control stands as one of the
most critical features of a MIDI sequencer. "Freehand tempo recording" is the only method capable of closely approximating
this natural pianistic imperfection. While the technique of quantizing note durations to a specific value range can be
helpful, it is a machine-calculated process and may, in doing so, inadvertently negate that very human imperfection.
Splitting a MIDI track into individual notes and events, such that notes of the same type are assigned to a shared track.
This capability of the sequencer is fundamental, as MIDI data-originating, for instance, from an input device such as a
piano with a MIDI port-does not necessarily have to be recorded in a manner that is separated and distributed by channel.
Furthermore, the separation into tracks is crucial for the analysis of music (a methodological and didactic approach that
can be implemented very effectively using MIDI).
The MIDI sequencer used does NOT, in principle, need to be capable of processing audio files.
On the contrary: audio software capable of processing wave snippets-that is, patterns-is (significantly) neglected
within the MIDI domain.
MIDI has absolutely nothing to do with wave snippets or wave patterns.
Modern soft pop music is produced en masse through the combination of patterns, such that the consumers of this music
need not possess a trained or sophisticated palate. Rather, sequences of patterns are repeatedly recycled as aesthetic
templates, thereby generating a massive volume of similar-sounding music-a practice that facilitates the continuous
commercial exploitation of consumers whose musical tastes are entirely predictable. The music consumer is thus
homogenized and rendered permanently exploitable. Strictly speaking, this constitutes a form of infiltration and,
consequently, external control. The entire realm of commercial *Schlager* and folk music-particularly in the
"Ballermann" style-serves as a prime example of this phenomenon.
The MIDI sequencer used does NOT, in principle, need to be capable of integrating VST instruments (VSTi) or VST effects.
These effects can take effect ONLY during MIDI playback and are, therefore, never part
of the MIDI data itself.
Far more important is to use-alongside a professional (because specialized) MIDI sequencer-a specialized
wave-processing program capable of sampling directly via the MIDI synth port and conveniently rendering
VST effects into the wave file retroactively (including saving the wave as MONO files). This type of
wave-processing software is now available as freeware as well, though Yamaha Steinberg WaveLab
remains a traditional market leader among paid software options.
Notes:
MIDI Track and Sequencer Track Numbers
In MIDI sequencers, MIDI track numbers typically start at 1.
Within the MIDI data itself, MIDI track numbers start at 0.
Sequencer tracks often start at 1.
A single MIDI track can be distributed across multiple sequencer tracks (all of which share the same track number).
User Errors in Sequencer Operation:
User error is inevitable.
If the data from the last correct step happens to be lost, this can entail an enormous amount of rework
(including the recreation of artistic ideas and intentions).
Consequently, versions of your MIDI data should be saved regularly as separate files.
There is certainly no such thing as a bug-free MIDI sequencer.
GUI errors-or illogical and cumbersome GUI layouts-are the norm. For example, the last
playback position is not saved; this creates an environment highly conducive to accidental clicks-due to
the minuscule size of the Play and Stop buttons-since these buttons are situated directly adjacent to
the buttons for jumping to the beginning or end of the piece. This proves only one thing: The software
manufacturer has never sufficiently tested their software-let alone used it in a real-world production
environment. The manufacturer has an inadequate understanding of practical user needs. However, this is
a luxury one can only afford in the absence of any competition.
_________________________________________________________________________________________________________________________________
_________________________________________________________________________________________________________________________________
Process in the active MIDI sequencer
0. Creating an Empty MIDI File (Type 1)
For developmental reasons, MIDI data exists in several types.
MIDI Type 1-the most recently developed type-is the one used.
MIDI Type 1
_________________________________________________________________________________________________________________________________
1. Views of a MIDI File
1.1. Track View
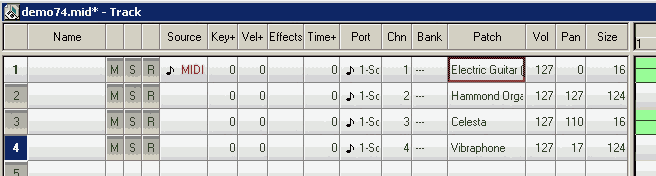
The Track View displays the available sequencer tracks, which may contain MIDI data.
Within this context, MIDI data can be further subdivided into tracks-though here, the term used is "MIDI Channel."
Unfortunately, the MIDI channel number in the sequencer interface may be displayed starting from 1 rather than 0.
Internally, however, MIDI utilizes channel numbers starting from 0.
Sequencer track numbers and MIDI tracks must not be confused:
A sequencer may, for instance, offer 64 tracks or more.
MIDI, by contrast, recognizes only tracks 1 through 16-with Track 10 typically reserved exclusively for drums.
To accommodate this, the data from a single MIDI track can be distributed across multiple sequencer tracks (a process
known as "MIDI data splitting"), thereby simplifying MIDI processing-particularly during the mixing stage.
MIDI data splitting is essential for effective MIDI processing, yet it is typically not a standard feature of the
sequencer's graphical user interface (GUI). Instead, the sequencer can often be extended with such capabilities-for
instance, by utilizing a scripting language supported by the software-to enable functions like splitting the notes
of a specific track.
It can also be extended to include the ability to remove duplicate notes and events that occur at the exact same
position and are assigned to the same instrument (optionally removing all such notes within a specified proximity
of that shared position).
Naturally, the removal of duplicate notes and events must function across multiple tracks.
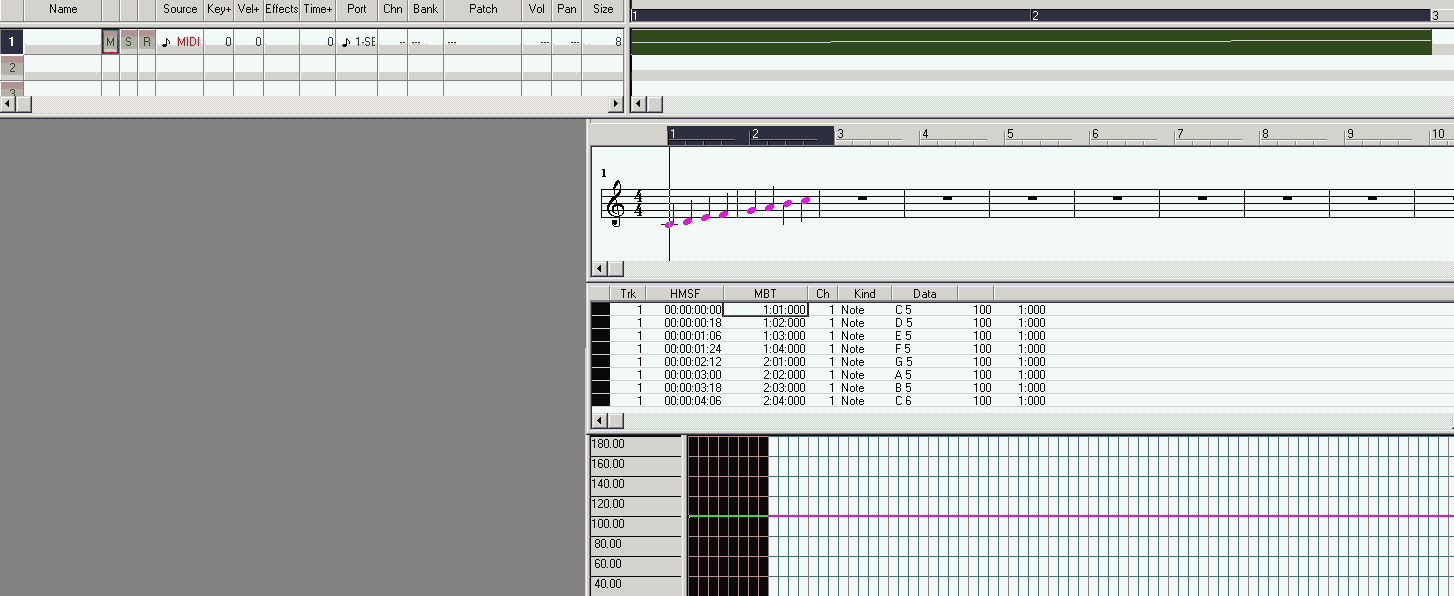
Track View
Track parameters such as MIDI channel, instrument, volume, and pan are missing.
1.2. Staff View
The note display depends on the capabilities of the sequencer.
Since MIDI operates in real time and is capable of sonically reproducing extremely short note durations,
it should theoretically be possible to handle note durations as short as, for example, 1/128th notes.
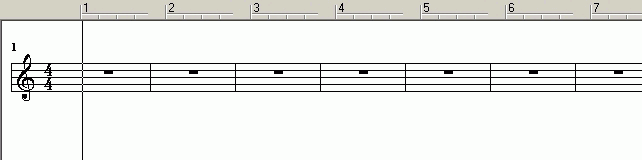
Most sequencers support 1/64th notes; ideally, a note duration of 1/256th would be available.
The time signature is either extracted from the MIDI file itself or, in the case of an empty MIDI file,
defaults to a standard value.
As a rule, a sequencer is not a comprehensive music notation program.
For the purpose of transcribing MIDI data-whether via a MIDI-enabled instrument (such as a piano) or using a
computer keyboard or mouse-dedicated software such as Capella or Sibelius is recommended; however, none of
these are freeware applications
.
In the context below, the "Staff View" is utilized solely to observe how MIDI data is represented in
musical notation.
Staff View
1.3. MIDI-oriented Views
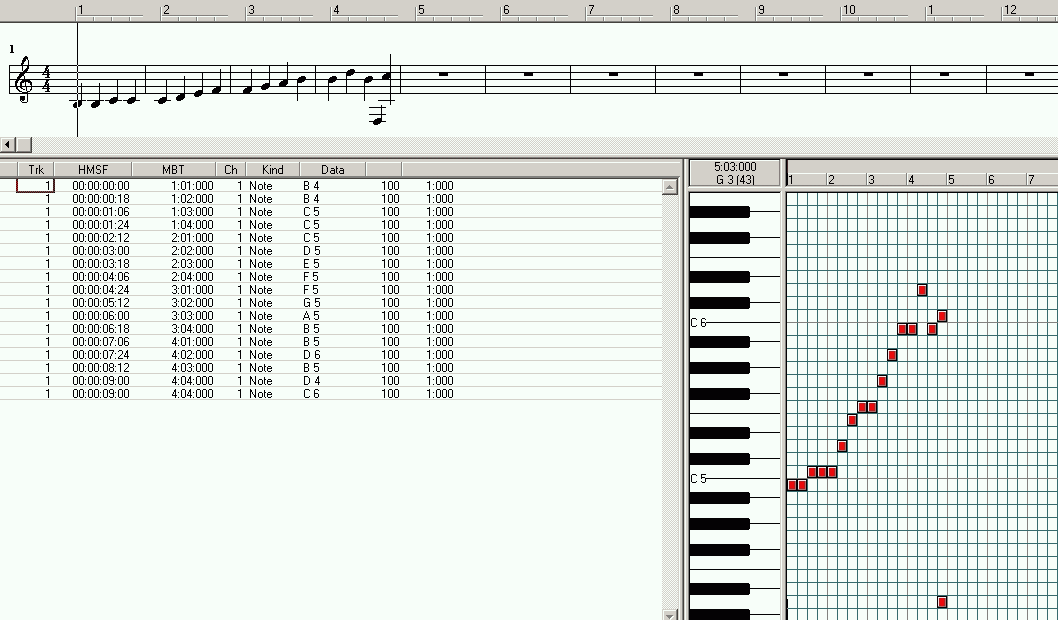
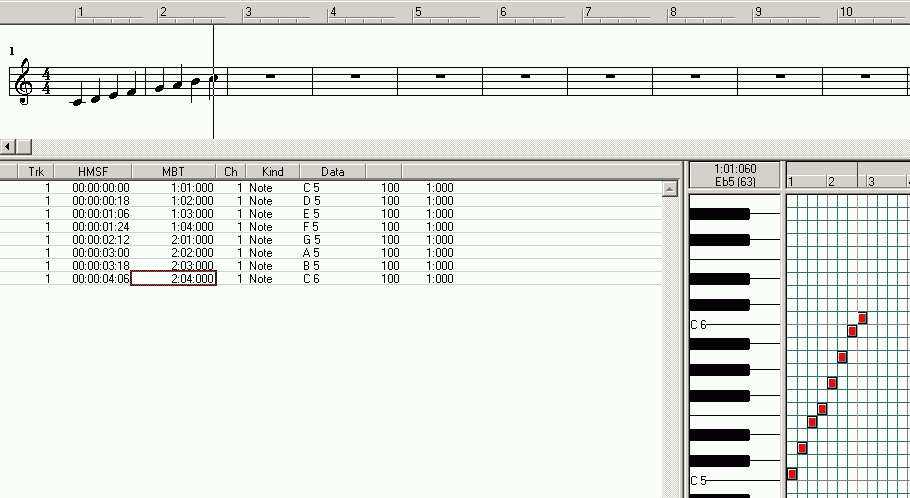
In the Event View, events-that is, all MIDI data-can be viewed.
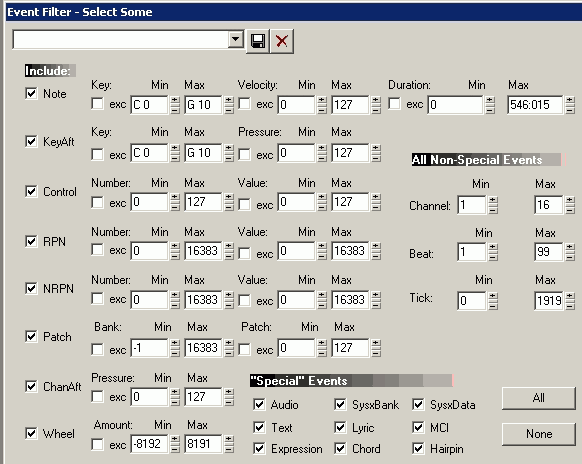
A sequencer MUST be capable of displaying events filtered by type, as well as in combinations of types.
This capability is fundamental for a sequencer.
For example: notes and controllers.
The Piano Roll is the view that is all but useless: this display serves merely to
indulge the laziness of "musicians" who are unwilling to learn how to read music.
The Piano Roll is a tool for dilettantes.
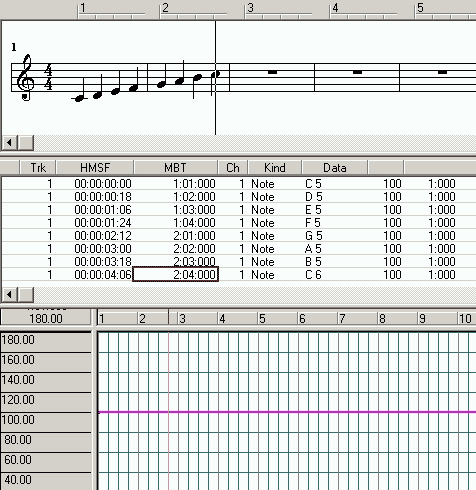
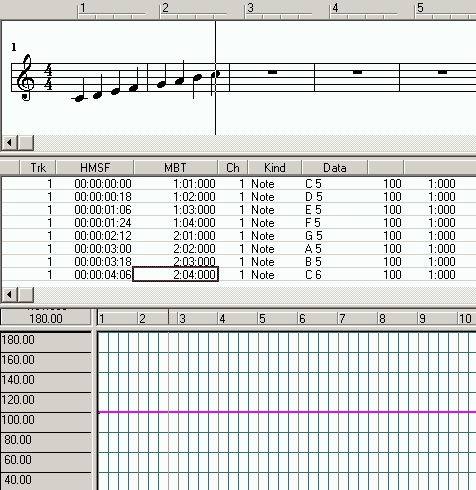
There are other important views as well-for instance, Tempo.
Event Types and Their Value Ranges-see also, and importantly: 6. Inserting MIDI Events.
Event List and Piano Roll
Staff View, Event List, Tempo
_________________________________________________________________________________________________________________________________
2. Note Entry and Correction of Incorrect notes
The task is to record the major scale from C5 to C6-specifically, the 8 ascending notes within the 5th octave.
All notes should be of equal duration, and there are to be no rests between them.
The time signature is 4/4, and the clef is the treble clef.
If a minor scale were to be used, semitones would be required; however, this approach is being avoided here.
Note entry using a computer mouse can occasionally result in errors. These errors must be corrected subsequently.
Corrections can be performed within the Staff View; however, since the objective here is to demonstrate how to
handle MIDI data, the corrections will be made within a MIDI-oriented view. This view must necessarily be the
Event List.
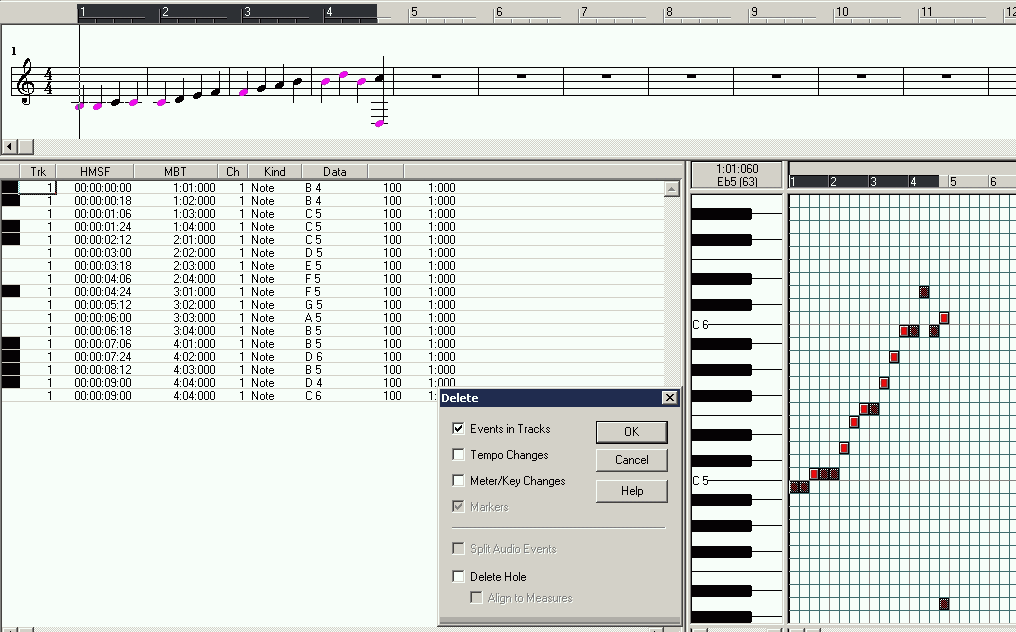
Delete Event
Result of note entry using the computer mouse:
All superfluous notes are selected with the mouse.
These notes are then deleted simultaneously.
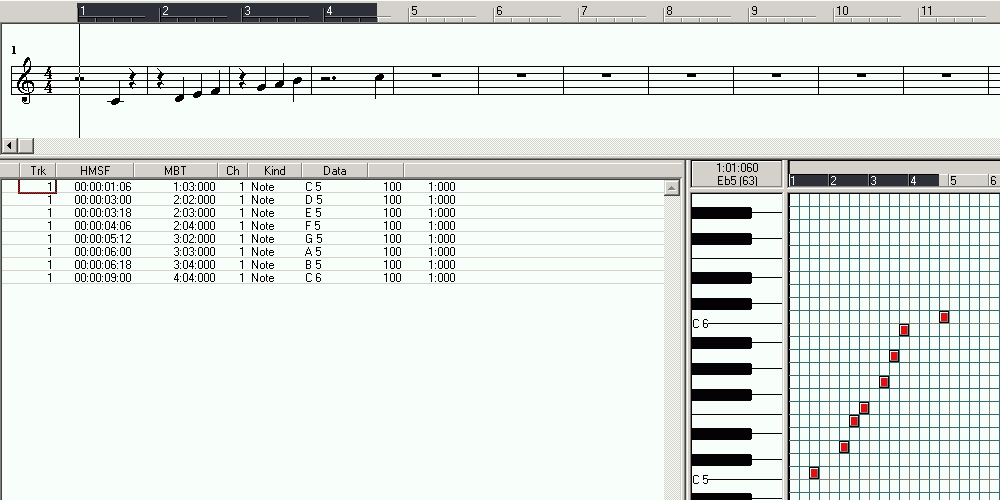
Deletion completed
The result of deleting superfluous notes.
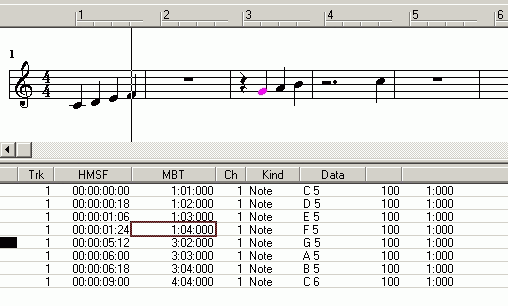
While all notes are of equal duration, there are rests.
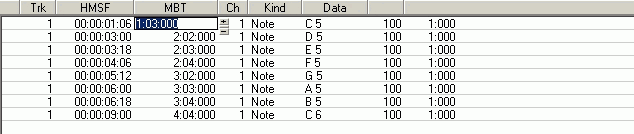
Start Time
To remove the rests, the start times of the notes are shifted into the rests-that is, to the left.
Note 1
Note 2
The first four notes are already without a rest.
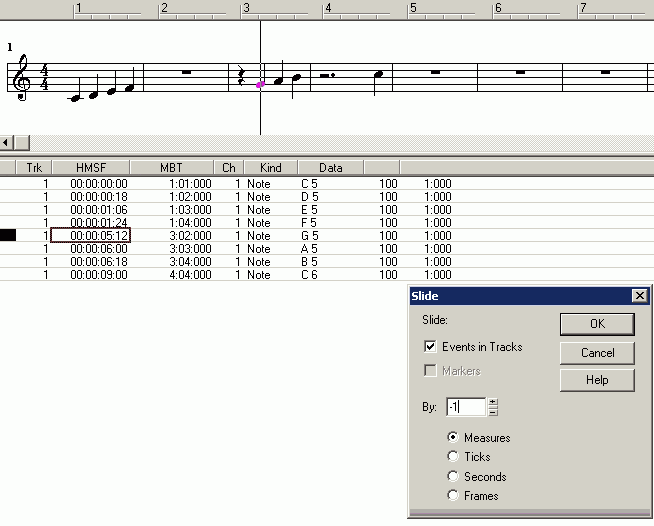
Slide 1
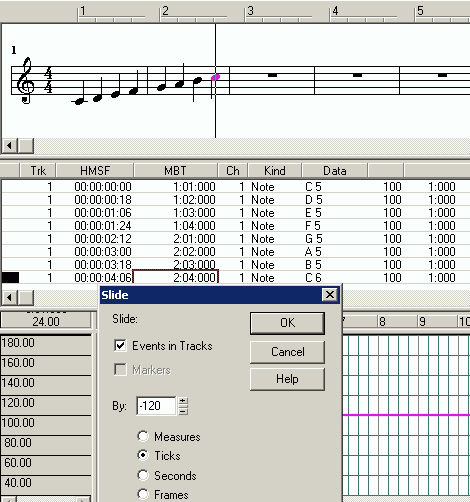
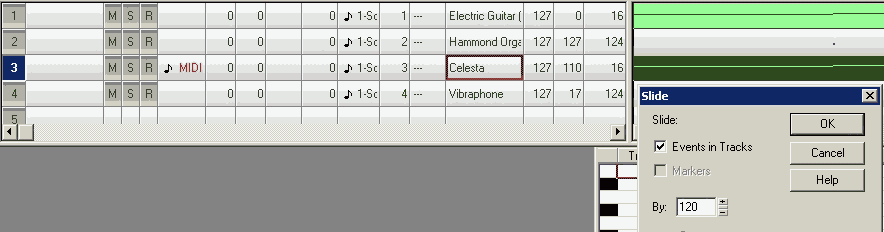
Adjusting the start times of notes can also be achieved by sliding the notes along the timeline.
However, this method may not allow for as precise a specification of the shift amount.
The section to be shifted must be selected-for example, a single note, multiple notes, or even one or more
entire tracks.
If a track is selected, the following rules apply:
If the selection begins at the very start of the track, nothing within that track can be shifted to the left.
If the selection extends to the very end of the track, nothing within that track can be shifted to the right.
There must always be an available space into which the selected material can be shifted.
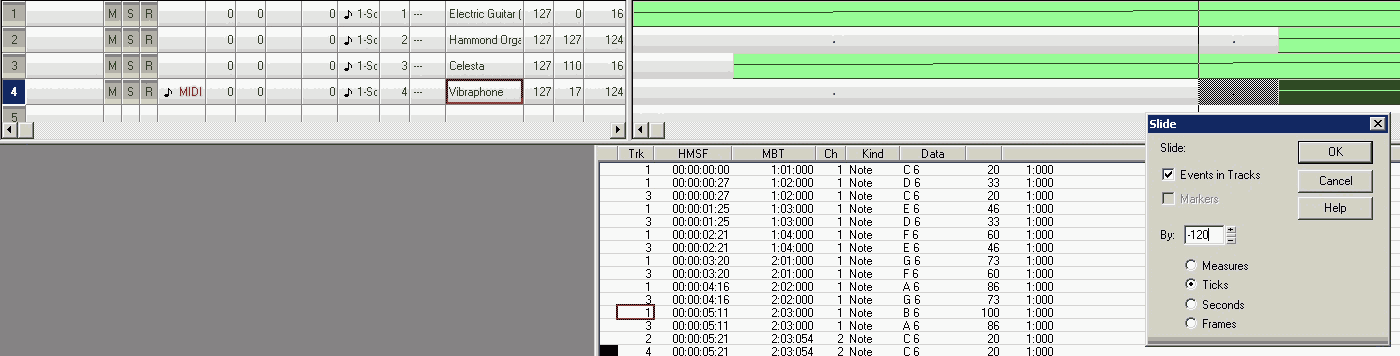
Values < 0 shift the selection to the left.
Note: The existing content to the left of the selection is irrelevant; the selected material is always shifted and
inserted to the left. If the beginning of the track is reached, no further shifting to the left is possible.
Values > 0 shift the selection to the right.
Note: The existing content to the right of the selection is irrelevant; the selected material is always shifted and
inserted to the right. If the end of the track is reached, no further shifting to the right is possible.
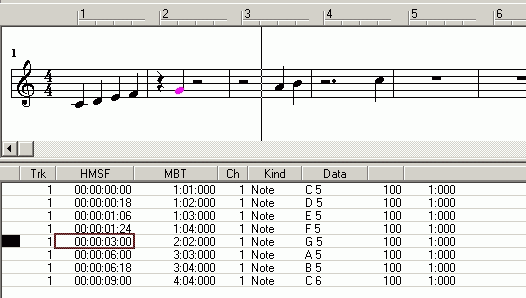
"Measures" refer to bars in standard musical notation format.
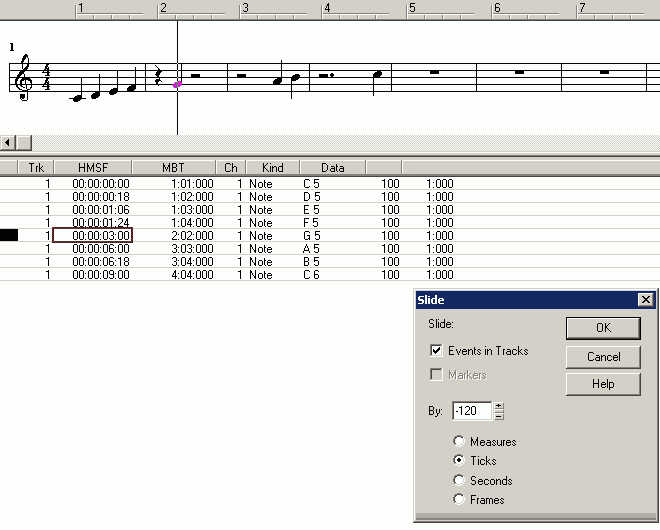
"Ticks" refer to note units in MIDI format.
Slide 2
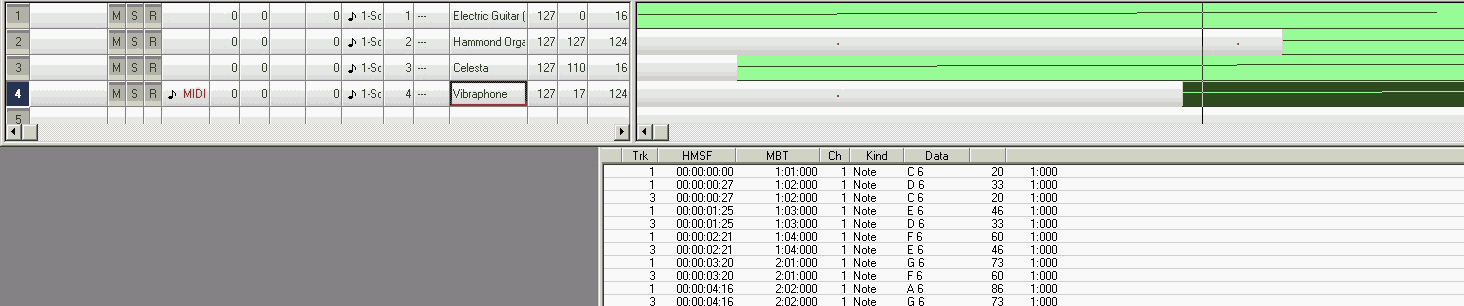
The note was shifted one bar to the left. However, the shift was specified too imprecisely, such that the boundary
of the preceding bar was not reached. One could now use "quantization" as an alternative form of sliding, but this
method is not necessarily precise either.
Slide 3
Further shift by the remaining ticks.
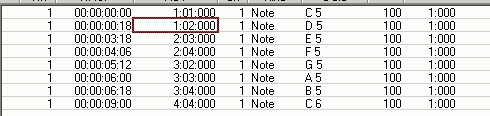
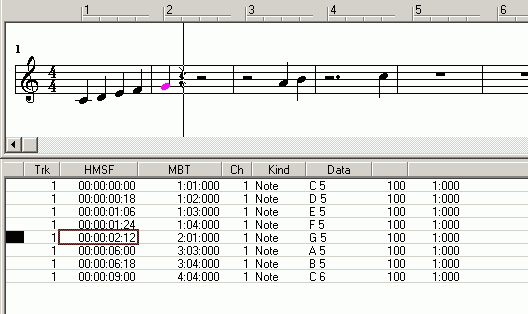
Slide 4
The new start time following the slide.
They could have also corrected the start time in the event list.
Copy
It is likely faster to manually correct the start times of the notes in the event list.
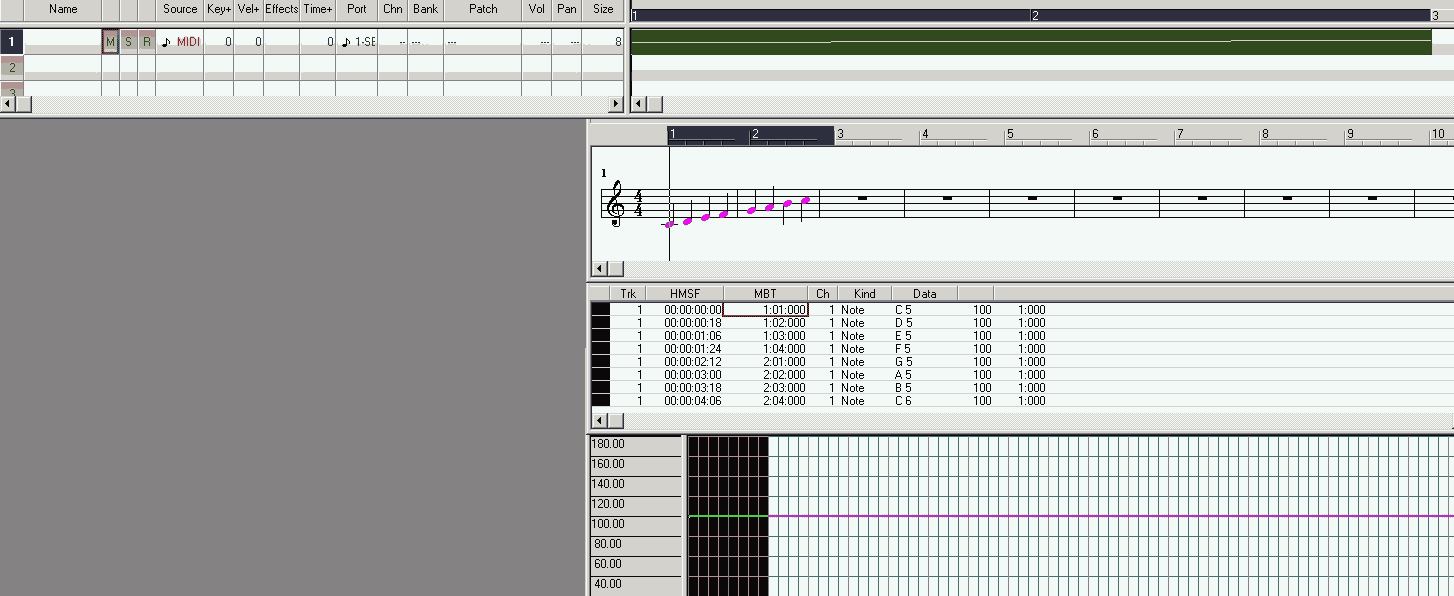
The desired notes are now present.
MIDI Standard Ticks
Ticks are units of time representing events such as musical notes. The sound card utilizes these ticks-specifically,
beats per second-as subdivisions of the musical measure.
Example: According to standard musical notation, a 4/4 time signature consists of 4 beats.
Under the MIDI standard, however, this corresponds to a user-defined number of MIDI beats (ticks)-for instance, 120 ticks.
Consequently, MIDI ticks essentially represent tempo. For this reason, tick settings are typically found within the tempo view.
The 120 ticks displayed in the current view were the value applied to the offset.
The tempo within MIDI files is frequently subject to change. Tempo serves as a key element of musical dynamics.
As a result, the specific application of tick settings is rarely standardized.
Slide 5
Not only notes can be shifted, but also events without a duration (e.g., an instrument change).
With "Events in Tracks" active, all events are shifted together (only within the selected track segment).
Note 3
View of the completed note entry
_________________________________________________________________________________________________________________________________
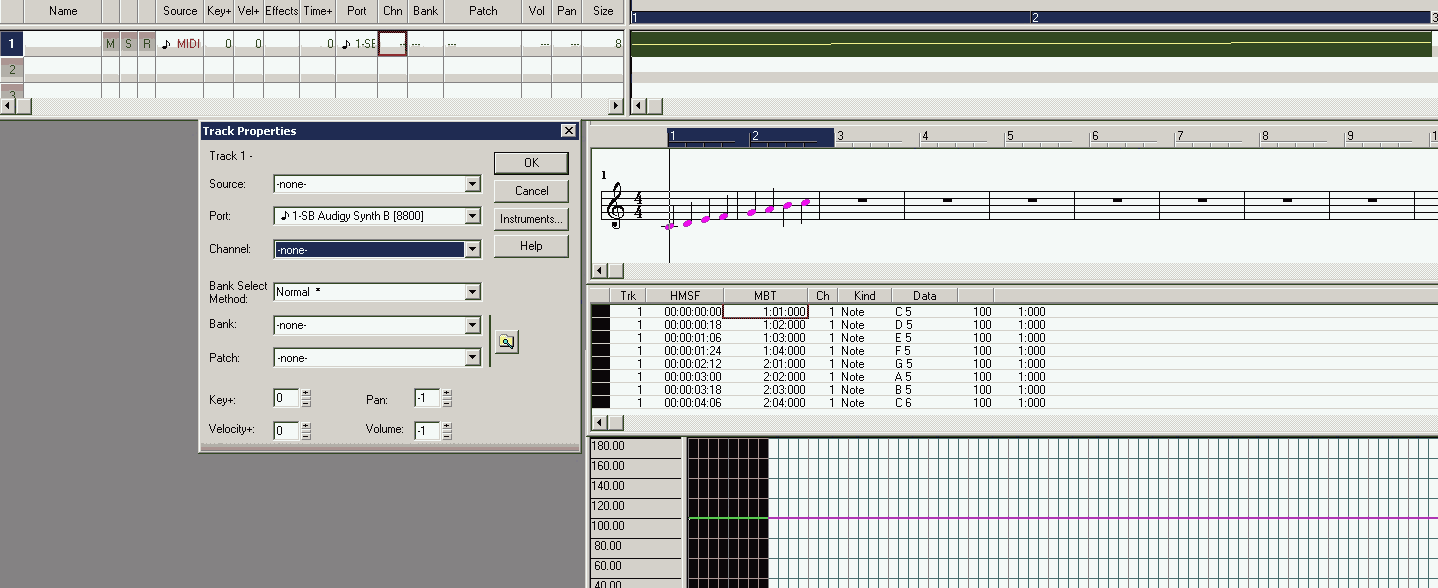
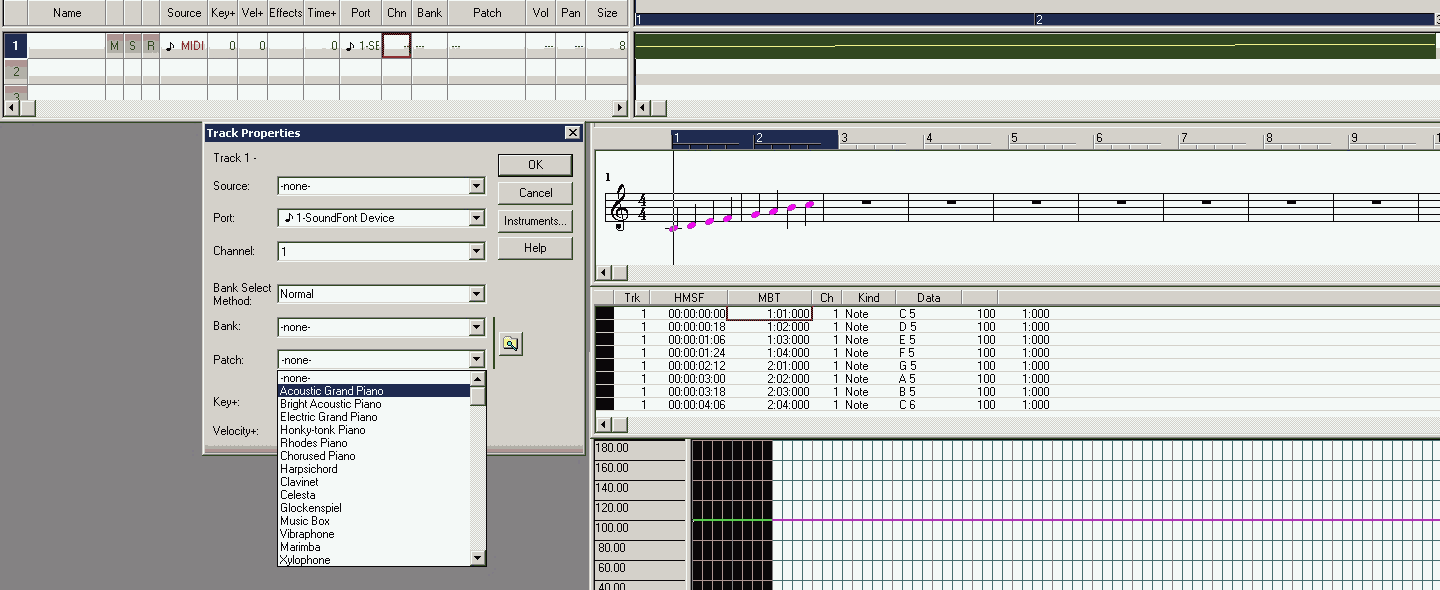
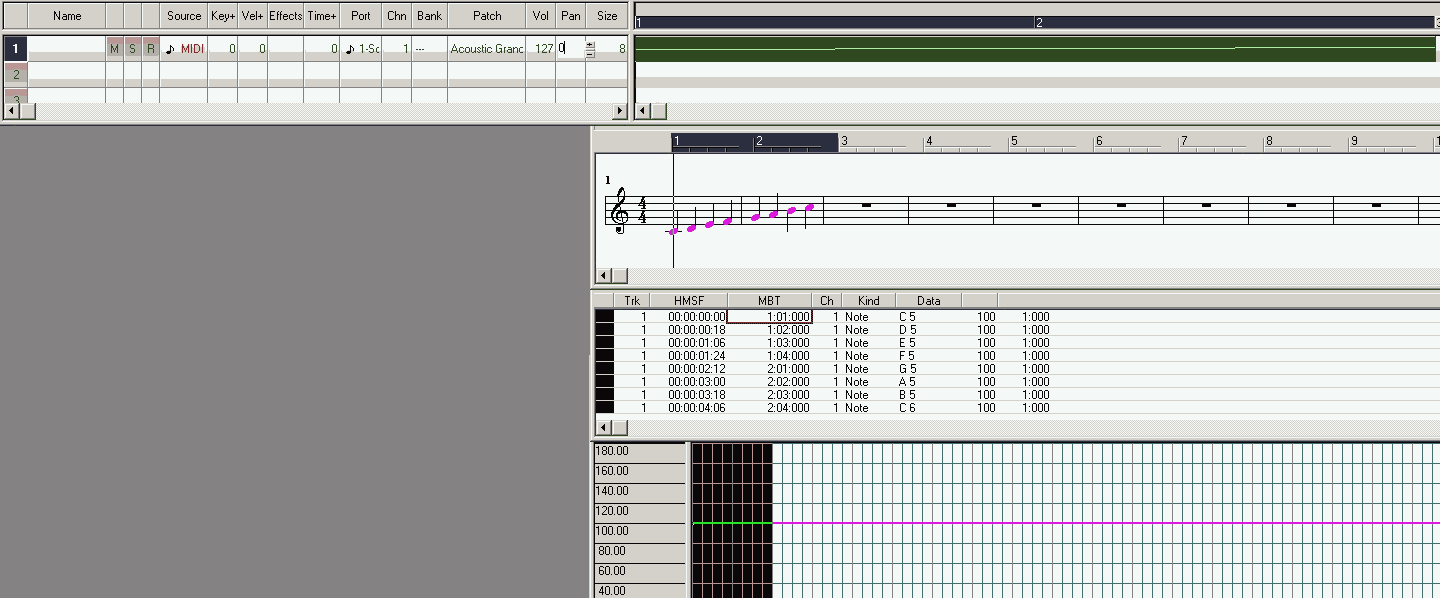
3. Set the track's instrument, MIDI channel, volume, and pan
The MIDI channel can only be assigned to one specific track.
Unlike the MDID channel, an instrument can change at any time within a track,
although multiple instruments cannot be used simultaneously.
The last specified instrument always takes precedence.
Volume is the default volume of the track, which can change at any time within a track.
The last specified volume always takes precedence.
Pan is the default stereo position of the track, which can change at any time within a track.
The last specified volume always takes precedence.
MIDI-Port
MIDI port of the sound card, which also uses the currently loaded soundfont of the sound card.
channel
Set the channel of the track.
Set the default instrument for the track.
Volume
Set the volume and pan of the track.
_________________________________________________________________________________________________________________________________
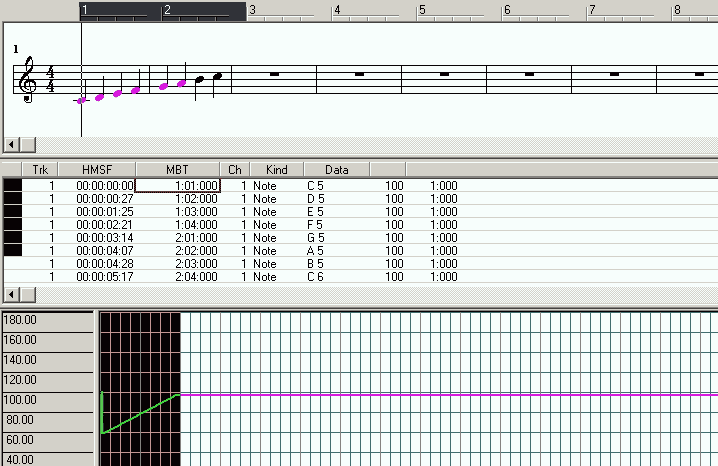
4. Set Track Tempo
A track has a default tempo in MIDI ticks, but the tempo can be changed within the track.
The last specified tempo always applies.
set tempo
Tempo Adjustment via Tempo View
From 70 ticks to 120 ticks in automatically determined, equal increments.
Adjusting the tempo by drawing in Tempo View is not tied to selecting a specific area; it can be done freehand.
Graphical tempo adjustment is a fundamental feature of a sequencer.
_________________________________________________________________________________________________________________________________
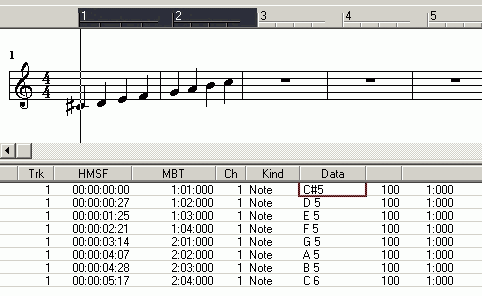
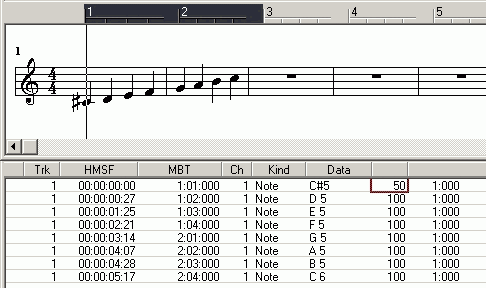
5. Changing the Volume and Duration of a Note
Volume Event
Volume change via Event View
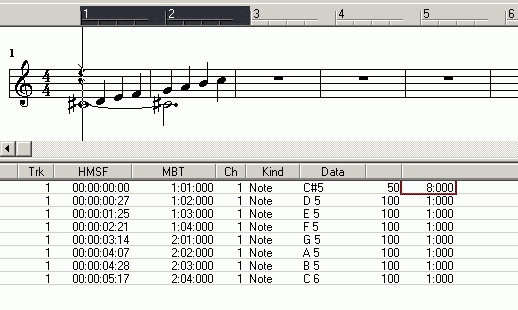
Set duration
Changing the duration via Event View
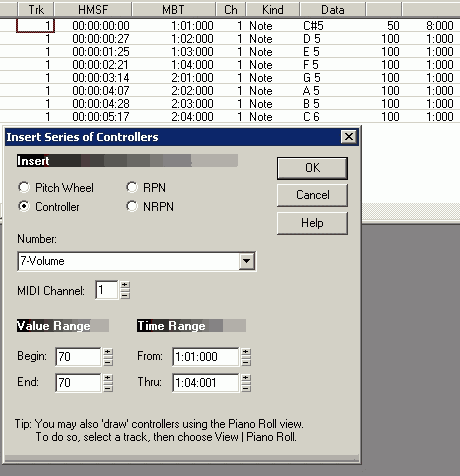
Volume Event area 1
Volume Event area 2
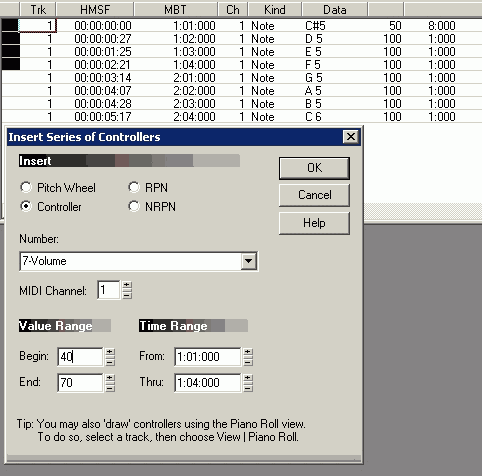
Changing the volume in a range of notes.
Inserting an event in a range can also be done without first selecting the range.
Specify the start and end values of the volume to be inserted.
Since volume is always part of a note, the note is modified.
If the start and end values are identical, all notes will have the same volume.
You must specify the time range. Do NOT assume that an already selected section of the track will be
automatically applied.
The MIDI channel must be specified: You can only modify events on channel 1.
Do NOT assume that the MIDI channel of an already selected track will be applied, as multiple tracks
can be selected simultaneously.
There is another way to modify events: see Interpolation.
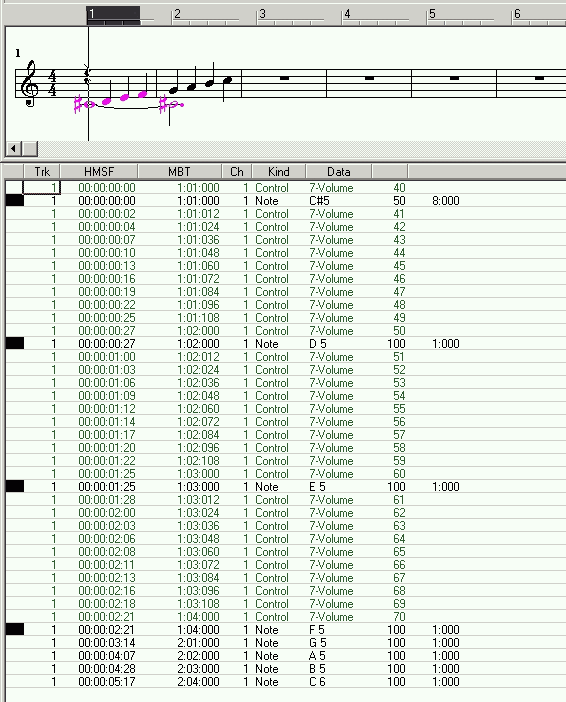
Volume Event area 3
With different start and end volume levels.
The volume automatically steps down, with equal increments.
If the start volume is greater than the end volume, the volume decreases to a lower level.
If the start volume is less than the end volume, the volume increases.
If the start volume is the same as the end volume, there is no volume change.
Volume Event area 4
Completed volume modification
_________________________________________________________________________________________________________________________________
6. Insert MIDI Events as Controllers
MIDI can receive data from instruments.
Since instruments are based on elements of pitch or timbre settings, MIDI must "recreate"
these instruments in terms of data.
For this purpose, a MIDI standard (GM-MIDI, General MIDI) has been agreed upon.
The following generally applies:
Every instrument manufacturer can, but doesn't have to, support MIDI.
If MIDI is supported, the instrument must be able to convert controls into data. The control element (controller) is
added to the data: From a MIDI perspective, these are controller numbers.
Da Instrumentehersteller Wert auf abgrenze Qualität legen, sind MIDI-fähige Geräte nicht nur teurer,
but also not necessarily GM-MIDI compatible.
A sound card in a computer that supports MIDI is also not necessarily fully GM-MIDI compatible. And not all instrument
controls can be played back via the sound card.
A common set of controllers must be agreed upon.
A sequencer supports all controllers because the sequencer is adaptable to the MIDI hardware.
Example of instruments with control elements that cannot be mapped via MIDI:
The organ, its stops, and its instruments are fundamentally organ-specific.
Therefore, an agreement on a comprehensive organ standard is not possible.
Sound generation via controller using a standard instrument pool:
General MIDI has established a set of instruments that a MIDI output device, such as a computer's sound card,
must recognize and be able to play.
Therefore, it is sufficient to work with the GM standard via a sequencer.
This also keeps the number of controllers common to all instruments manageable.
MIDI output devices can generate instrument timbres.
via pure MIDI FX sound chip mode
Soundfont
VSTi Instrument
Like Soundfonts, VSTi instruments are a collection of tones of an instrument that are combined in real time to
make the instrument sound. MIDI notes can therefore control Soundfonts and VSTi.
AHowever, Soundfonts and VSTi are otherwise unrelated to MIDI.
Since VST instruments not only involve large amounts of data but are also not exactly inexpensive, and a soundfont
is often included with the sound card, VST instruments will not be considered further.
A sequencer must use the MIDI port of the sound card that is connected to the soundfont.
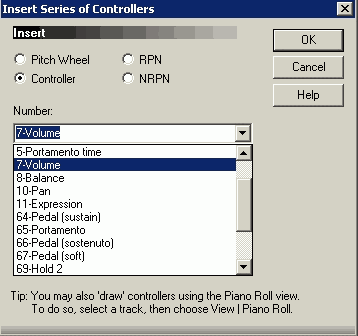
6.1. MIDI events as a controller (except pitch wheel)
Inserting events can also span multiple tracks.
Events are also generated by device controls (controllers), such as a piano's foot pedal.
These controllers only apply to their associated MIDI track.
A sound card only supports essential controllers.
Controllers that the sound card doesn't recognize are not used by the sound card: You can only hear whether a
sound card can process the controller.
From MIDI files containing controllers that are
specific to the instrument manufacturer
not recognized by the sound card,
the unnecessary controllers should be removed.
The following events are important for sound cards that are installed in a typical computer:
Volume MIDI Controller Number 7 Volume (0 mute to 127 maximum volume)
Volume of the note, actually part of the note itself
Example: A piano has a key as a control element, the velocity of which determines the volume. Therefore,
Volume is a controller.
The last set volume always applies.
The track's volume is overridden as soon as a volume controller appears in the track.
See 9. Changing the Velocity of the Note
See 11. Changing the Expression of the Notes
Pan MIDI controller number 10 stereo position (0 far left, 64 exactly center, 127 far right)
Example: From the pianist's perspective, a piano has the bass notes to the left of the pianist, hence Pan left.
Therefore, Pan is a controller.
The last set Pan setting always applies.
The track's Pan is canceled as soon as a Pan controller appears in the track.
Expression MIDI controller number 11: Expression level (0 no volume gain, 127 maximum volume gain)
Example: The notes in a track have a uniform volume because the pianist didn't adjust the MIDI device.
Adjusting the volume afterward without changing the volume is possible using expression.
Volume is part of the note.
Expression is volume that is not part of the note.
Expression allows you to further modify the volume of a note.
Expression is independent of velocity and volume:
It adjusts the current volume.
Expression works relative to the current volume.
The last set expression always applies.
There is no expression for a track.
Note: The track's volume is overridden as soon as a volume controller appears in the track.
The last set volume always applies.
See 9. Changing the Velocity of a Note
See 11. Changing the Expression of Notes
Sustain MIDI controller number 64
Reverb or damping
Example: A piano has a sustain pedal.
The last set sustain setting always applies.
Controller types
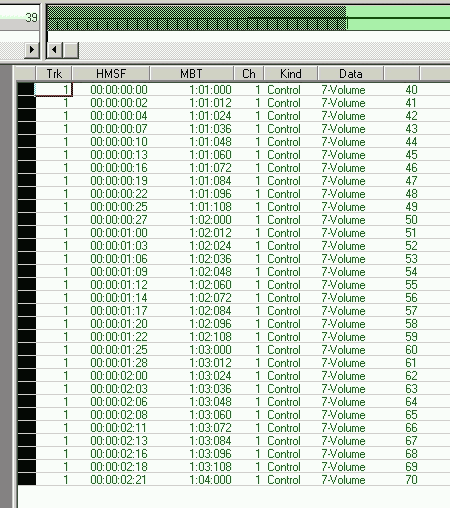
Controller 7
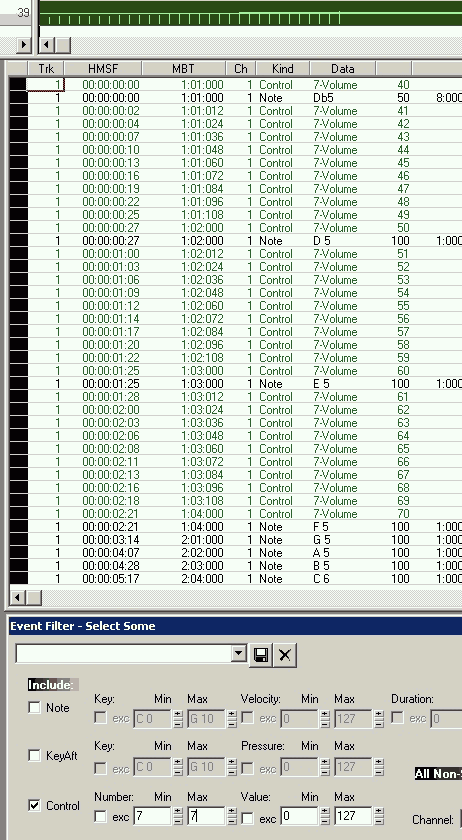
Event View shows only Controller 7 in the MIDI file overview25.mid
Event View has been filtered: Everything that is not a controller has been hidden.
Filtering events in the Event View is a fundamental feature of a sequencer.
Event Filter 1
Event View Filter for the purpose of selecting specific controllers, e.g., Controller 7.
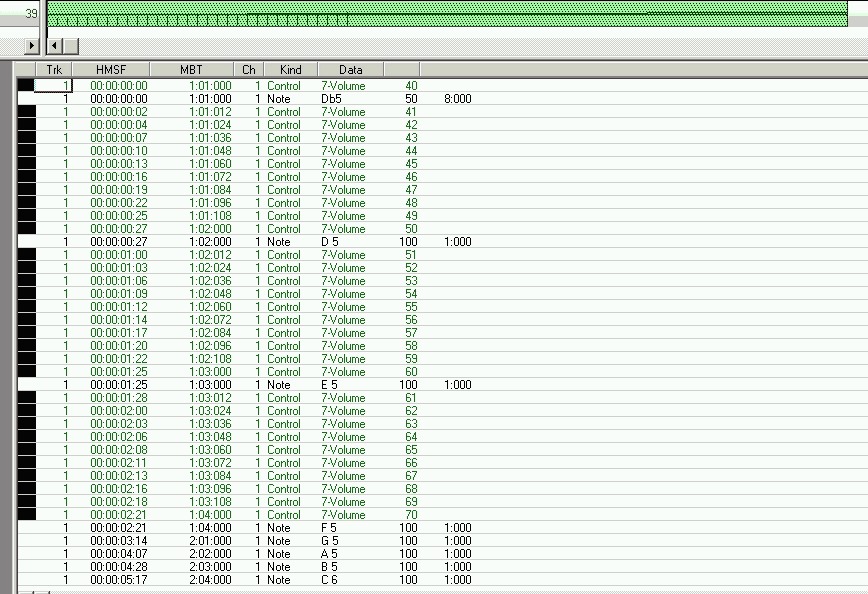
Event Filter 2
Controllers marked via Event View Filter 7 (selected controllers in a previously marked track)
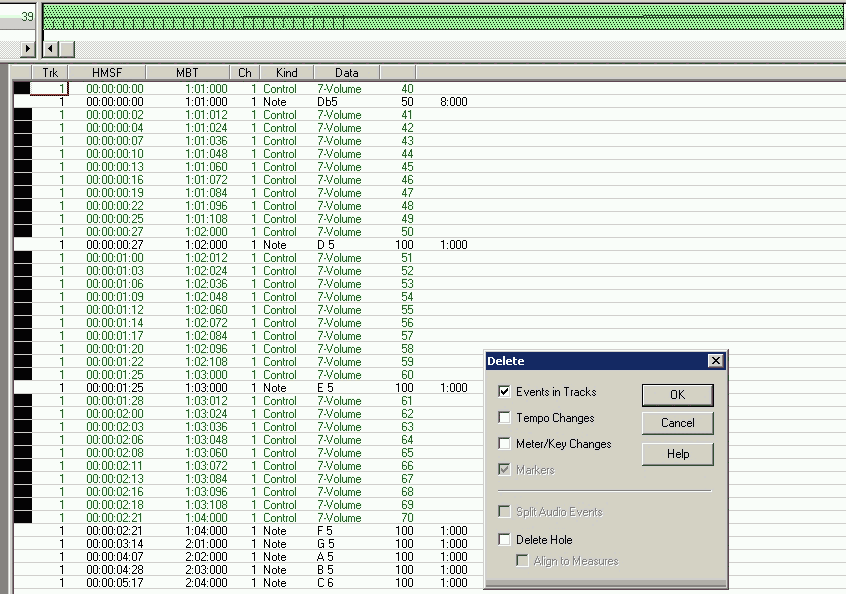
Event Filter 3
Delete selected controllers
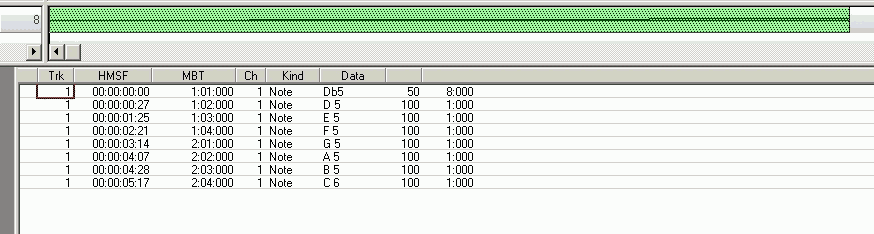
Event Filter 4
MIDI data has no controllers
6.2. MIDI events as a controller Picht Wheel
The control element for the sliding pitch is found on an electric organ or a guitar (lever).
This control element can be set separately in the sequencer, but it functions like a normal controller.
Picht Wheel
Pitch wheel as an extra controller
_________________________________________________________________________________________________________________________________
7. Change Note Duration
7.1.Change Note Duration without interpolation
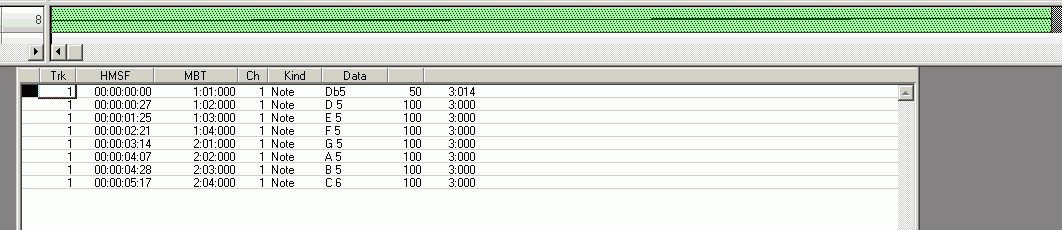
The duration of a note can be changed, for example, in the Event View, since the duration is part of the note itself.
Because changes to note duration occur frequently, the sequencer may offer a setting for grouping notes by selection.
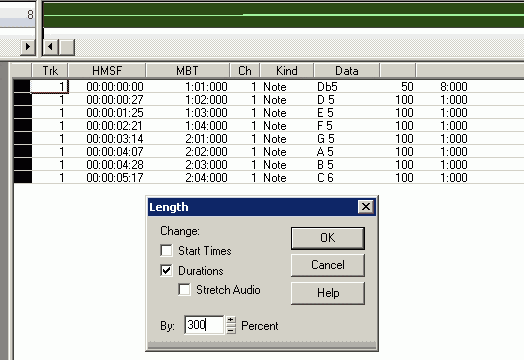
Duration 1
All selected notes will have their duration set to 300% of their current duration.
The following applies:
If the value is 100%, nothing will be changed.
If the value is greater than 100%, the duration will be increased.
If the value is less than 100%, the duration will be decreased.
Changing the start time of any note is best done using the Slide function.
Audio Stretch is only necessary if the sequencer has loaded a WAV file in a sequencer track, for example,
whose duration also needs to be adjusted.
Since WAV files are not related to MIDI, this case is not considered.
Duration 2
New duration for all notes.
Duration 3
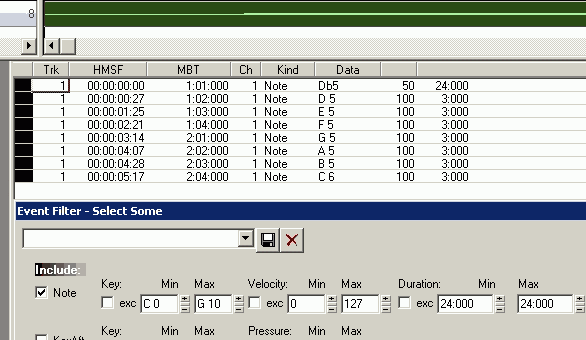
New duration for all notes.
In the selected track, all notes with a duration of 24 bars should be selected.
Events that do not meet this requirement will be deselected.
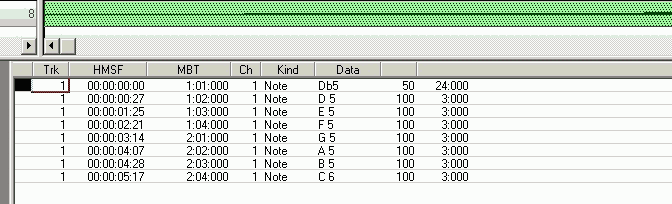
Duration 4
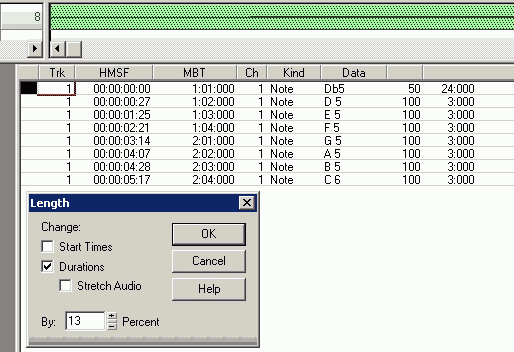
Duration 5
This note will have a new duration of 13% of the old grade duration.
The note duration will be shortened.
Duration 6
As you can see, percentages are not precise enough.
7.2. Change note duration with interpolation
Interpolation: Manipulating events across midi data
In some sequencers, finding and replacing events is called interpolation.
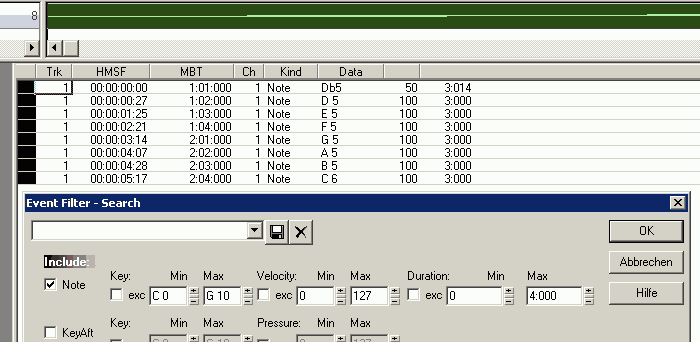
Interpolation 1
Example Interpolation - Finding Steps by Selection
In the selected track, all notes with a duration of no more than 4 bars should be selected.
Events that do not meet the criteria will be deselected.
The duration of the selected notes should be adjusted.
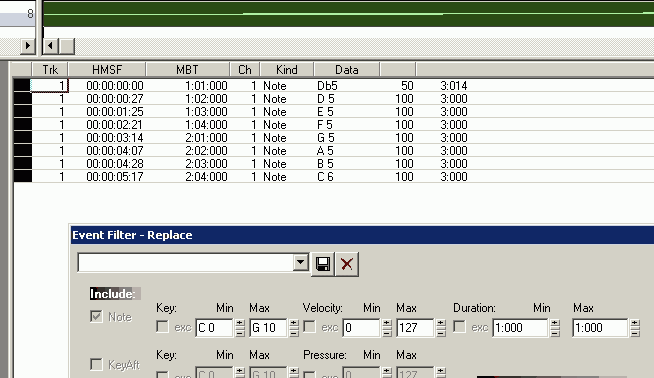
Interpolation 2
Interpolation - Specify target values for each step
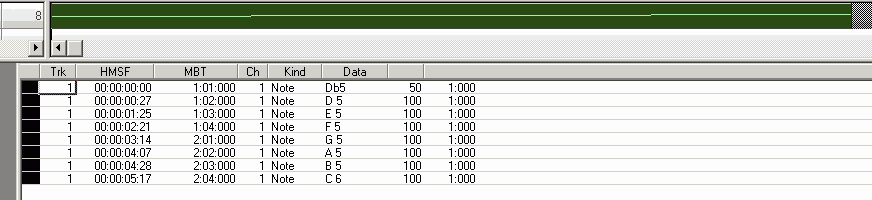
All selected notes will be set to a common duration of 1 tact.
Interpolation 3
_________________________________________________________________________________________________________________________________
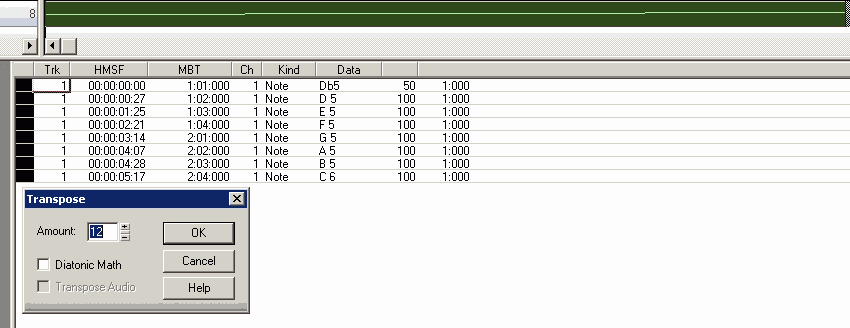
8. Change Note Pitch
The duration of a note is changed, for example, in the Event View, since the duration is part of the note itself.
Because changes to the duration of a note occur frequently, the sequencer may offer a
setting for grouping notes by marker.
Octave 1
All marked notes are raised by 12 semitones, i.e., by 1 octave.
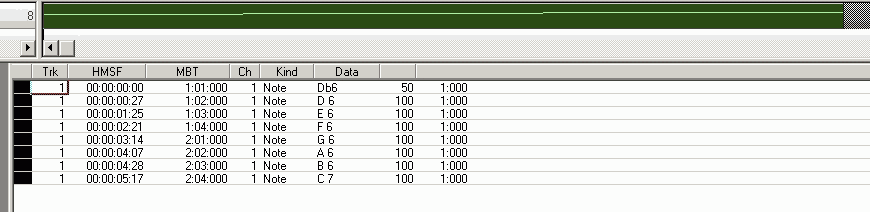
Octave 2
_________________________________________________________________________________________________________________________________
9. Change Note Velocity
The velocity is changed, for example, in the Event View, since the duration is part of the note.
Because velocity changes occur frequently, the sequencer may offer a setting for notes grouped by marker.
Velocity is regularly linked to volume changes, for example, on a piano.
However, since volume already exists as volume and there's also expression for volume, only the following combination makes sense:
Volume is only assigned to the entire track. Volume is not used otherwise.
Each note receives its velocity and thus a volume.
The volume within the track can additionally be changed via expression, so that velocity remains unchanged.
Expression is independent of velocity and volume:
It adjusts the current velocity (or current volume).
Expression works relative to velocity or volume.
Therefore:
The maximum velocity of all notes in the track should be the track's volume.
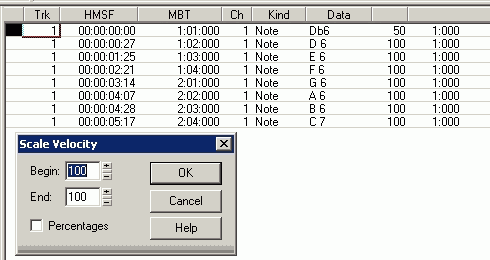
Velocity 1
The selected note should have its velocity set to 100.
Volume is used according to the track settings.
There is no expression.
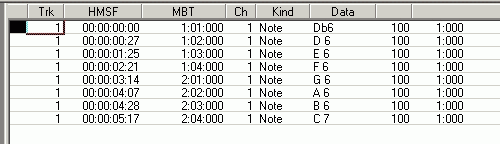
Velocity 2
Velocity 3
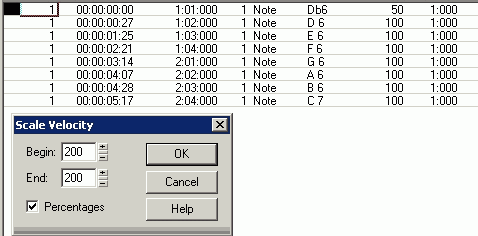
The selected note should have its velocity set to 200%.
Volume is used according to the track settings.
There is no expression.
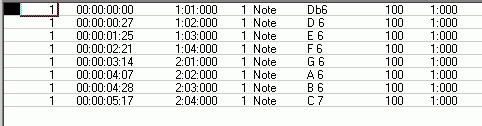
Velocity 4
New velocity setting.
The value cannot be automatically increased above 127.
Velocity 5
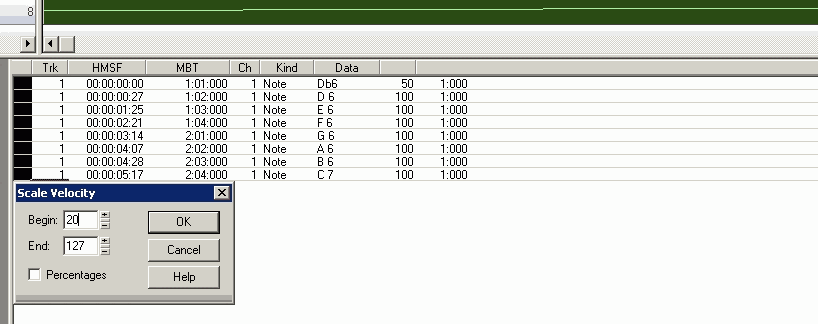
The selected notes should be graded according to their velocity.
The first note receives a velocity of 20.
The last note receives the last cumulative velocity value, up to a maximum of 127.
All other notes are automatically graded in equal increments.
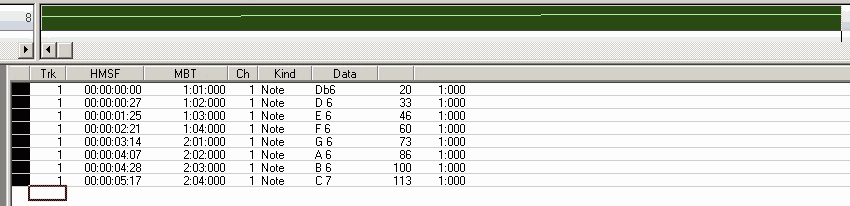
Velocity 6
New velocity setting.
The last note is not 127 because the automatic step size determined it to be that size.
The step size depends on the number of notes, with a step size of 1 being the minimum (i.e.,
127 notes can be stepped with a step size of 1. If there are more notes, several consecutive
notes automatically share a common step size of 1).
_________________________________________________________________________________________________________________________________
10. Copy Events
Events can be copied within a track and between tracks.
Duplicates are possible.
Entire tracks can be copied.
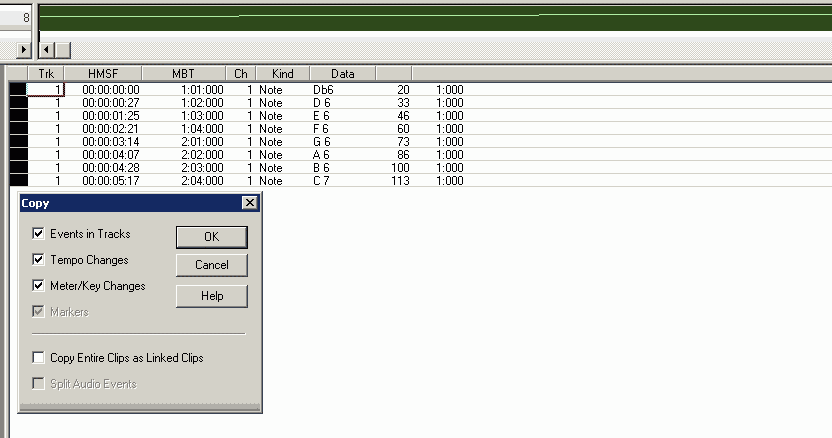
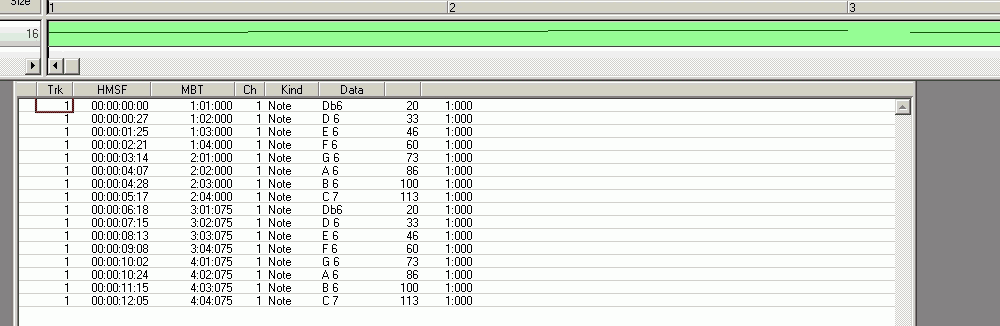
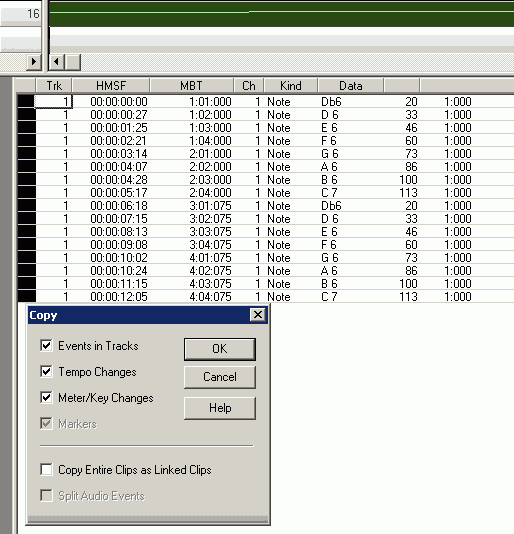
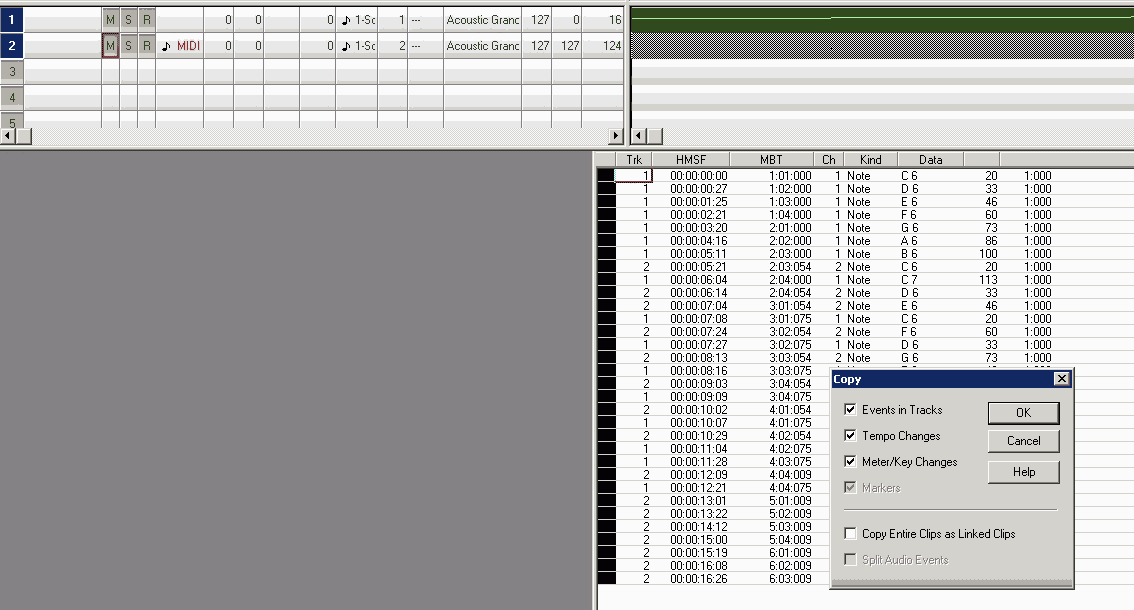
Event copy 1
From all selected tracks and their
events,
Ttempo information, and
key information,
select for copying.
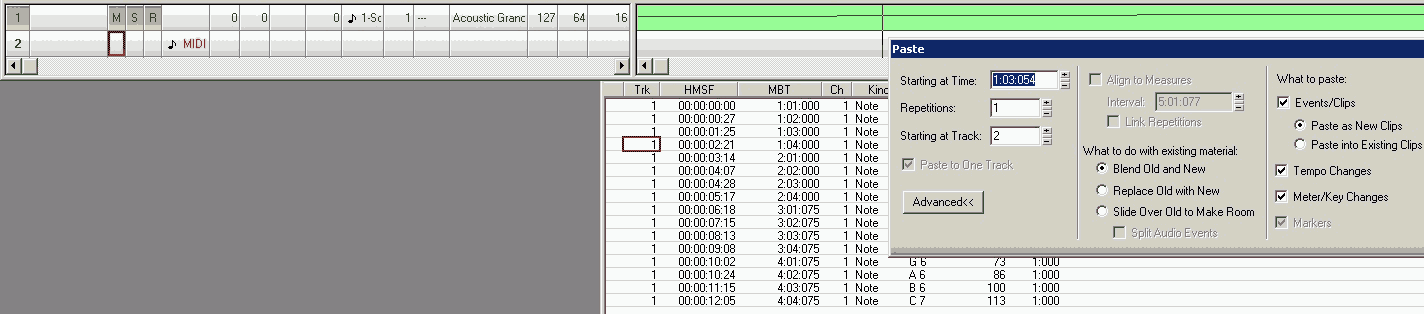
Event copy 2
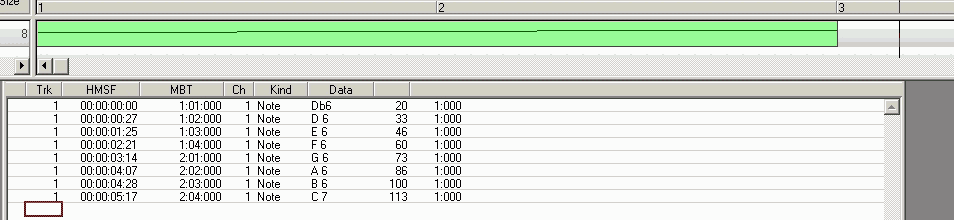
Specify the starting position from which the data to be copied should be placed..
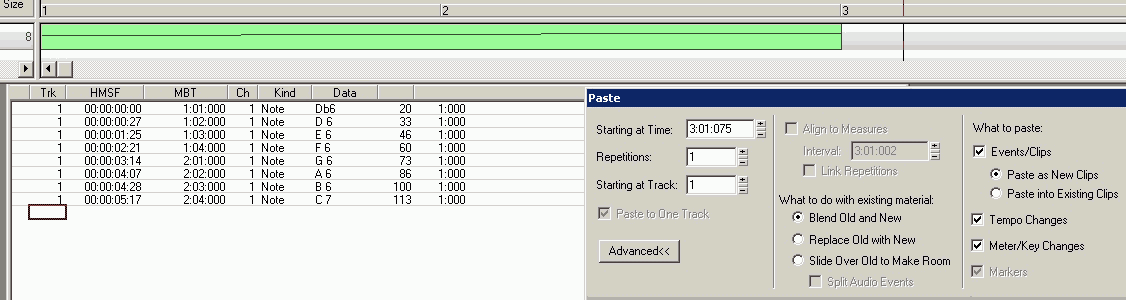
Event copy 3
From the available copyable data, use only:
Events,
Tempo information,
Key information,
using:
Retrieve data,
Insert data from the current position, preserving existing data
(Caution: Duplication is possible).
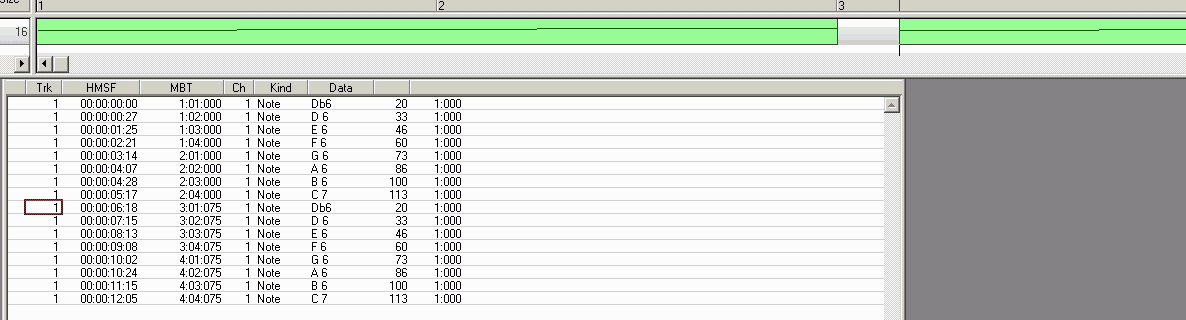
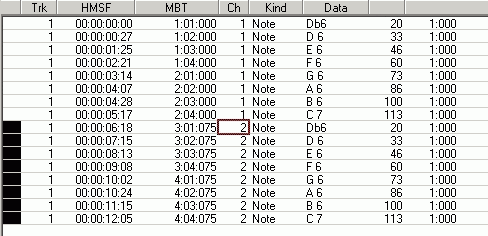
Event copy 4
Event copy 5
Change the channel number via Event View, then save the file.
Event copy 6
Open saved file: The channel number cannot be changed via Event View.
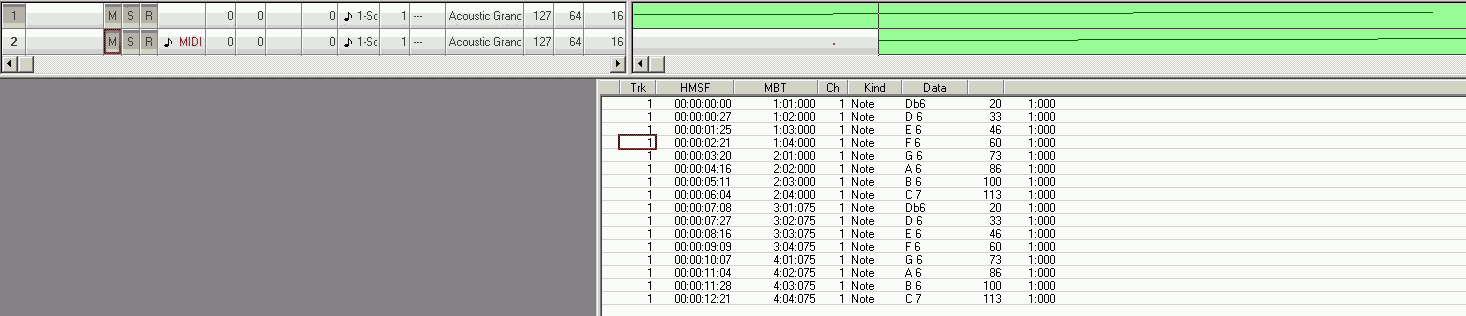
Event copy 7
Event copy 8
to track 2 but at a different starting position
Event copy 9
Event copy 10
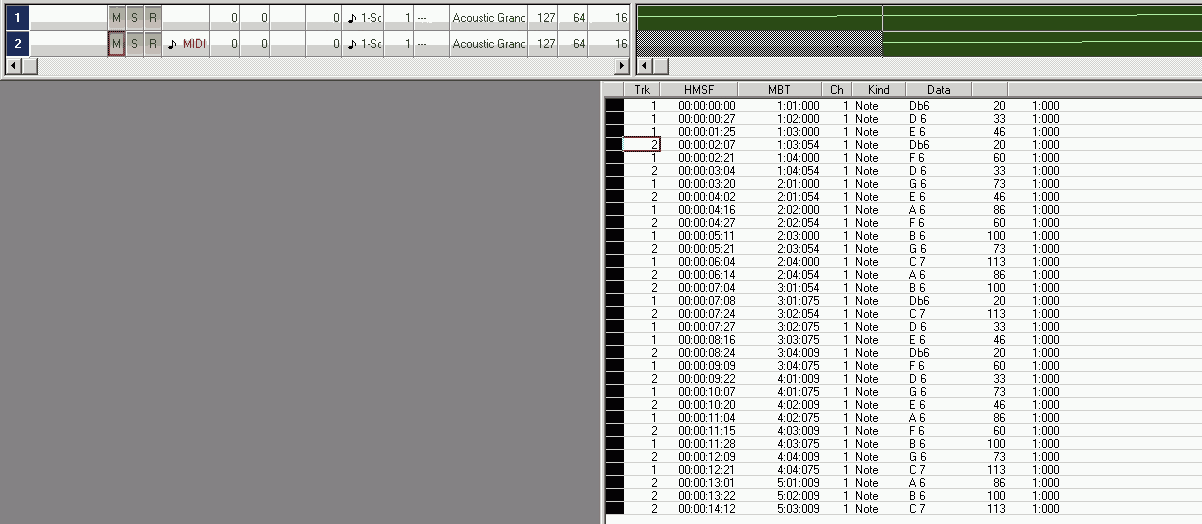
Event View of Tracks 1 and 2
Both tracks share a common MIDI channel.
Event copy 11
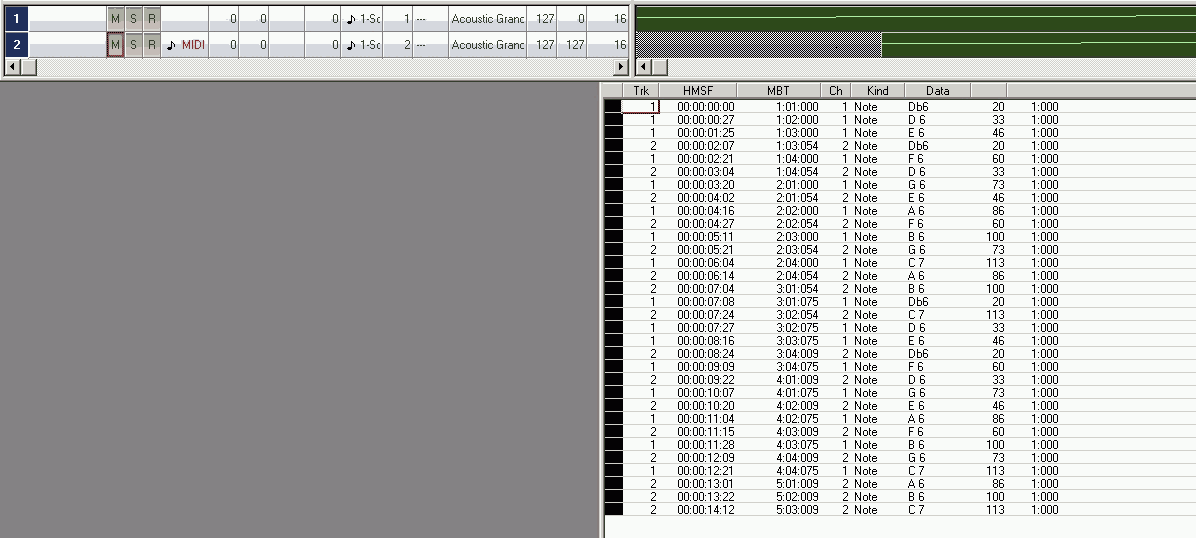
Changing the channel number is possible via the track view.
Adjust the pan of each track (0 for fully left, 127 for fully right).
Event copy 12
Event View of Tracks 1 and 2
Each track has its own MIDI channel. This enables panning.
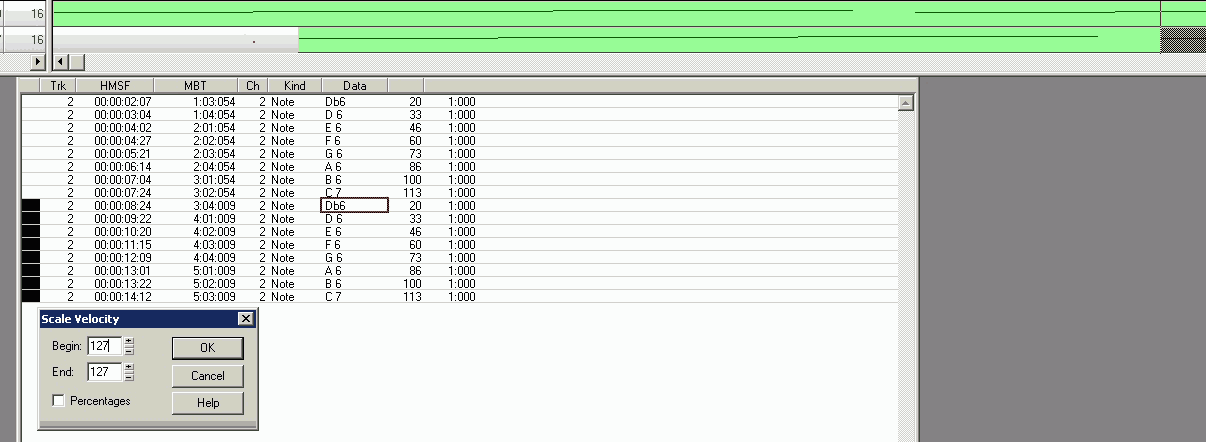
Event copy 13
Change the velocity in track 2.
All selected notes will have a common velocity of 127 (maximum value).
Event copy 14
_________________________________________________________________________________________________________________________________
11. Change the expression (Controller 11) of the notes
Volume is part of the note.
Expression is volume that is not part of the note.
.
Expression allows you to change the volume of a note without changing the Volume value.
Expression is independent of velocity and volume:
It adjusts the current Volume.
Expression works relative to Volume.
Example: The notes in a track have a uniform volume because the pianist didn't adjust the MIDI device.
Adjusting the volume after the fact without changing the notes is possible using Expression.
However, since Volume already exists as Volume and there's also Expression as Volume, only the following combination makes sense:
Volume is only assigned to the entire track. Volume is not used otherwise.
Each note receives its velocity and thus a volume.
Therefore: The maximum velocity of all notes in the track should equal the track's Volume.
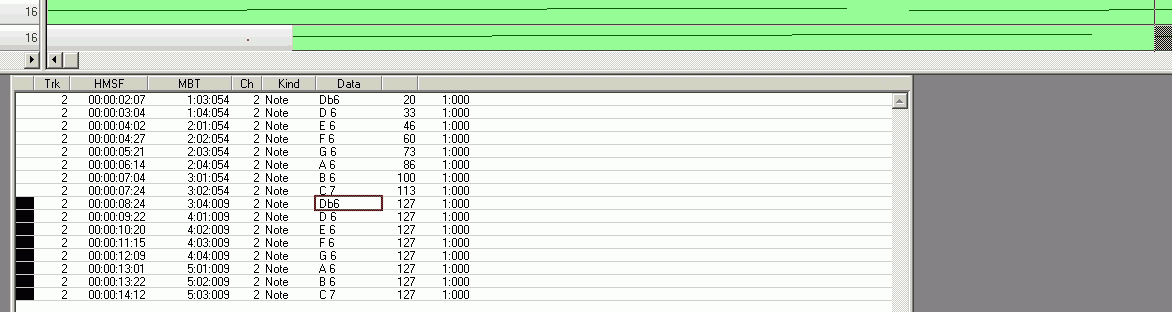
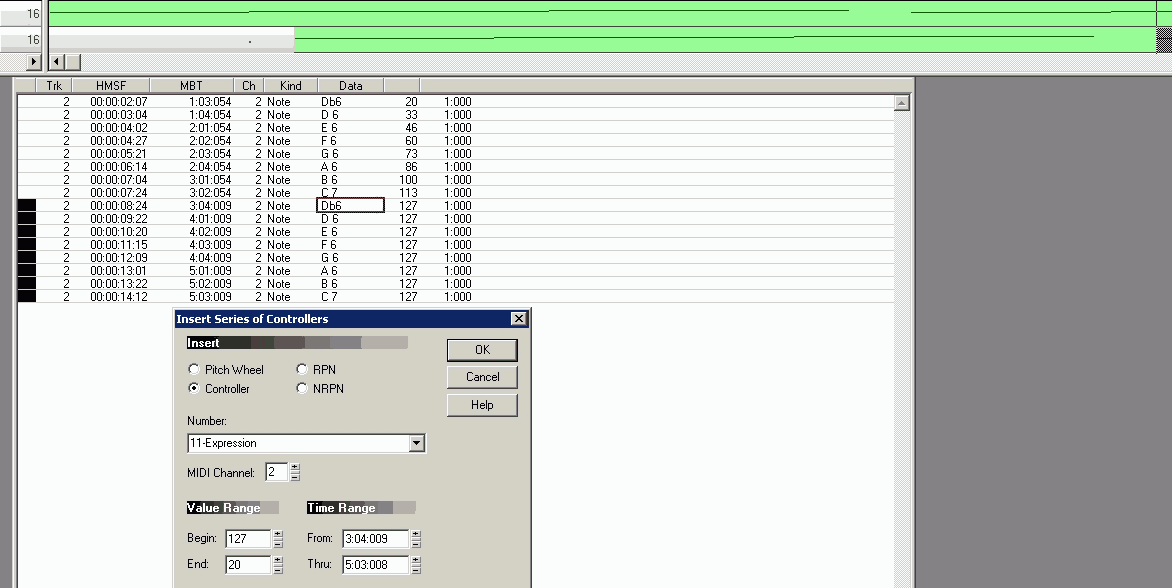
Expression 1
Track 2: Insert the controller values in increments for all selected notes.
The first note receives Expression 127, meaning the note velocity remains unchanged.
The last note receives Expression 20, meaning the velocity is significantly lower.
All other Expression values are automatically inserted in increments of the same size.
The increments are automatic, with each increment being equal.
If the start value is greater than the end value, the increments are lower.
If the start value is less than the end value, the increments are higher.
If the start value equals the end value, no increments are applied.
Do NOT assume that the MIDI channel of an already selected track will be used,
because multiple tracks can be selected simultaneously.
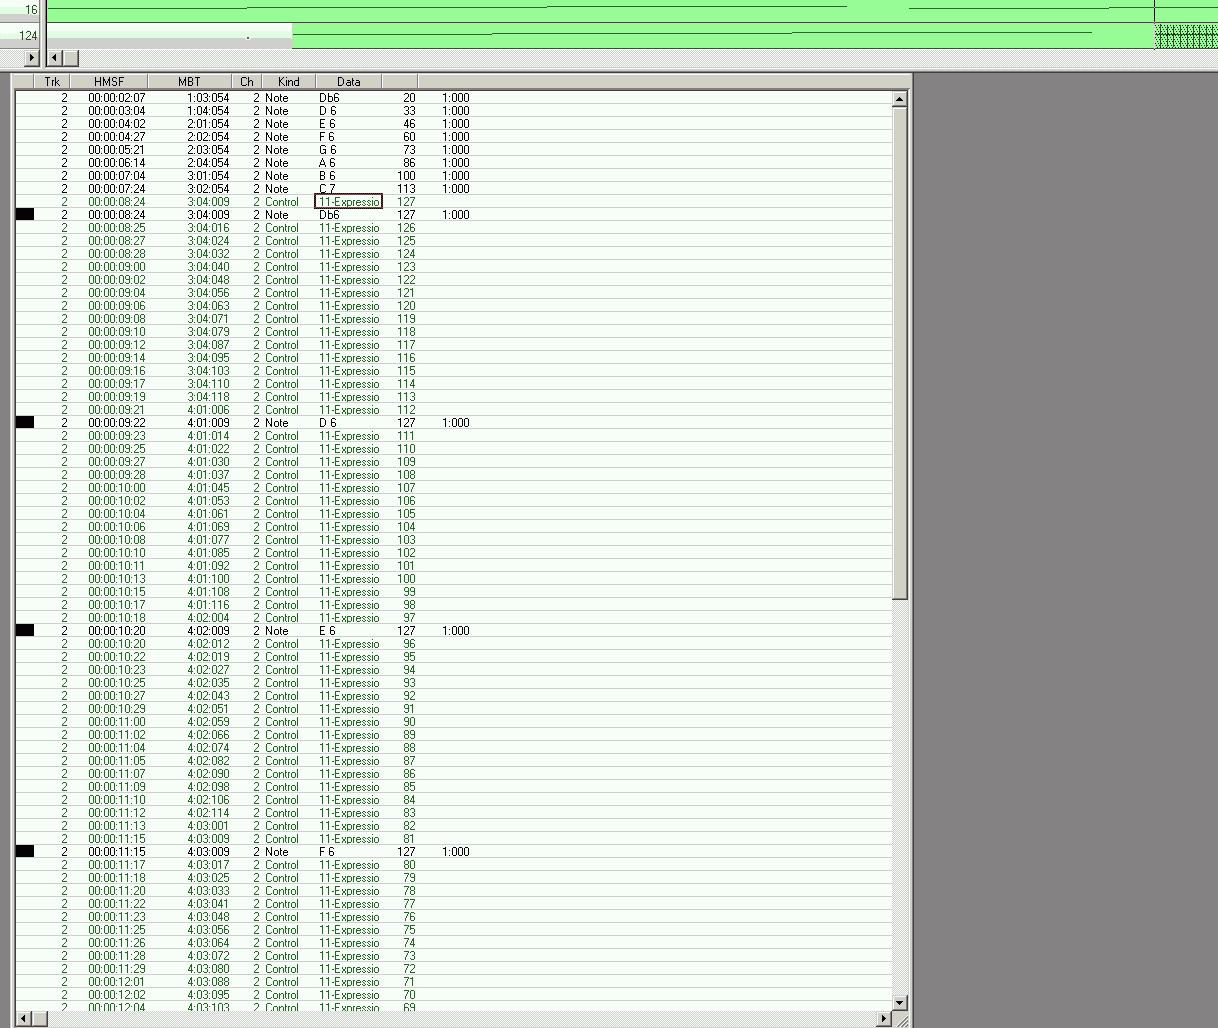
Expression 2
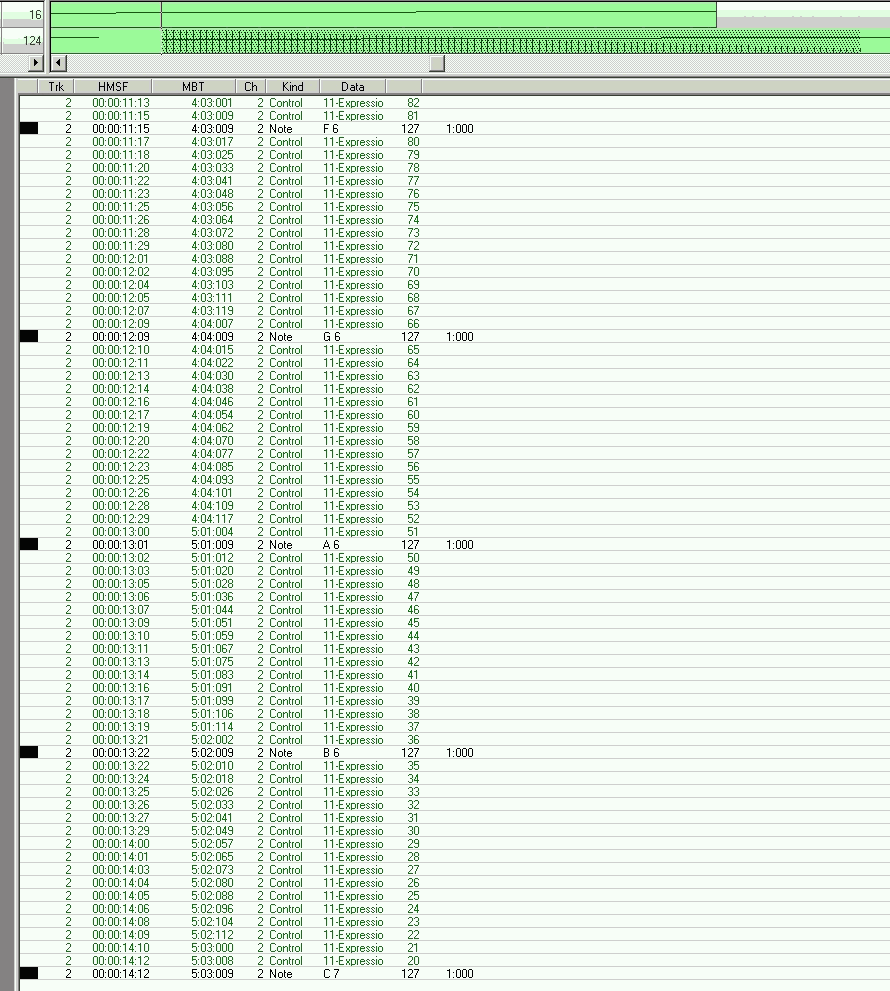
Inserted Expressions
The volume is reduced by a step of 1. The sound card therefore lowers the volume while the note is sounding.
A piano only recognizes this behavior as the decay of the note.
With expressions, you can therefore lengthen or speed up the decay, provided the note duration is long enough.
Each step thus requires 1 tick.
Expression 3
Expression Event Labeling in Track View
_________________________________________________________________________________________________________________________________
12. Changing the Note Type
Note type ist der Notenname wie D#6 oder Db6.
D capital letter
# raises D by a semitone
b lowers D by a semitone
6 Octave 6
Enharmonic equivalence:
The scale of an octave comprises 12 semitones.
The octave thus represents the octave on a piano keyboard.
Technically, however, semitones do not produce perfectly clean tones.
On a piano, the notes are tuned to each other (tempered).
This is the task of the piano tuner.
For example, J. S. Bach wrote works for the "well-tempered clavier."
The sound card in a computer is a technical device and can theoretically generate exact tones, including tones that are
not well-tempered. This is why playing music through a sound card is an excellent way to train your ear for tones and deviations.
Unfortunately, this very precision of the sound card becomes its downfall, as there are only 12 tones per octave. To still obtain
tempered tones, one uses a SoundFont for the sound card, which reads tempered tone snippets from the SoundFont and thus generates
a tempered instrument in real time.
However, the fact is: The Creative Labs Sound Blaster Audigy I sound card cannot generate tempered tones for all instruments.
For example, tempering the bass is apparently not straightforward. For string instruments, the general rule is: Recreating strings
using tone snippets is not possible with good quality due to the technical limitations of the sound card.
This disadvantage applies to ALL VST instruments that represent strings.
The reason is: The sound card doesn't have enough resources to reproduce the timbre via overtones in real time.
The resolution of the tones, i.e., the duration of the sound snippets, is also insufficient.
Sound card manufacturers generally don't prioritize excellent MIDI in combination with SoundFonts.
The Sound Blaster Audigy I can quickly be pushed to the limits of its playback quality with 15 MIDI tracks of strings, where multiple
voices play in parallel (parallel notes) per track.
For professional playback, MIDI hardware modules must be used, which not only offer better SoundFonts.
Anyone wanting to work with VST instruments in conjunction with MIDI needs a more powerful computer that can load and process massive
amounts of VST instrument data into main memory.
Incidentally, MIDI itself runs on computers from the Pentium III generation onward with a 200 MHz CPU.
The sound card only requires additional CPU resources when working with VST instruments or large SoundFonts that need to provide data
in real time.
Because of the tempered 12 semitones, different notation representations have the same effect, which the piano tuner adjusts.
C
C# identical with Db
D
D# identical with Eb
E
F
F# identical with Gb
G
G# identical with Ab
A
A# identical with Cb
The identities are valid ONLY because of the tempering of the notes.
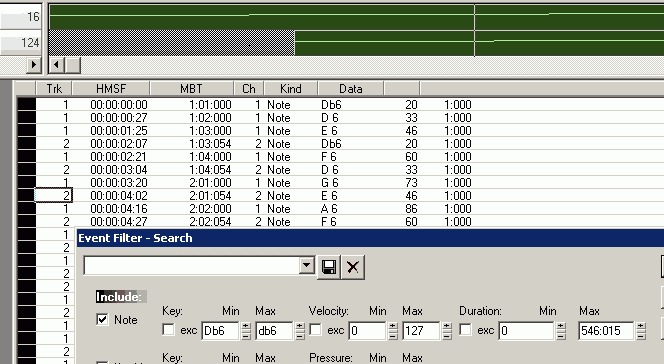
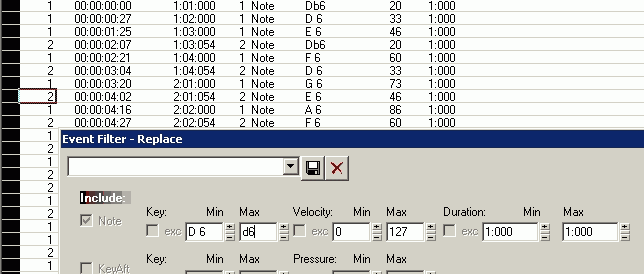
Note type 1
Option 1: Interpolation is used.
In the selected track, select all notes Db6 to change.
Note type 2
To change the notes, convert them to D6 and simultaneously set the note duration to 1 tact.
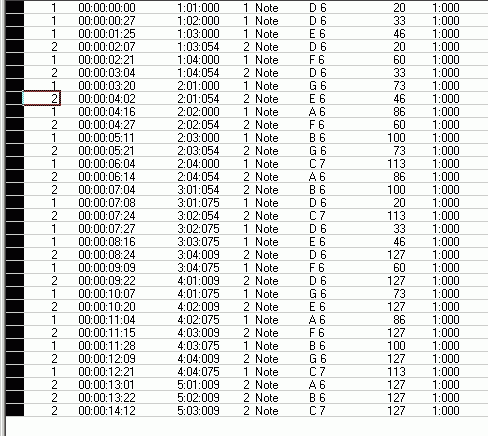
Note type 3
Result of the interpolation
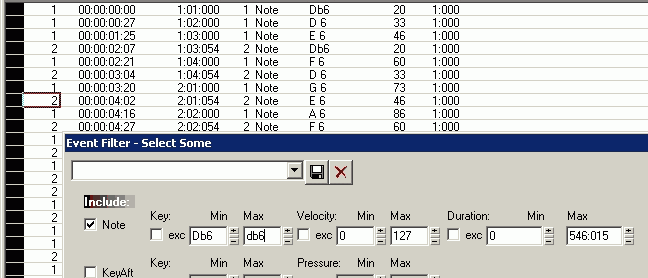
Note type 4
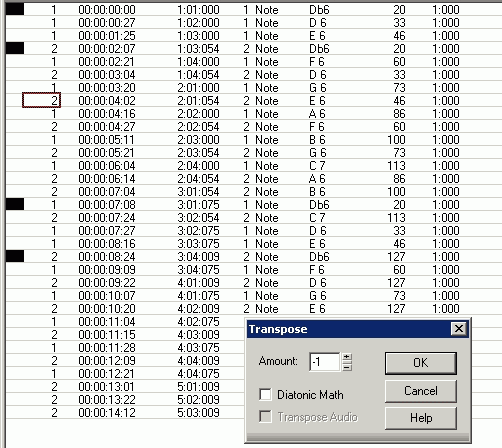
Option 2: Octave transposition is used instead of interpolation.
Select all Db6 notes in the highlighted track.
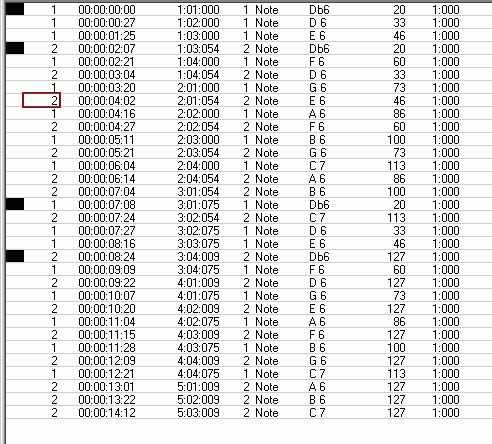
Note type 5
Note type 6
Note type 7
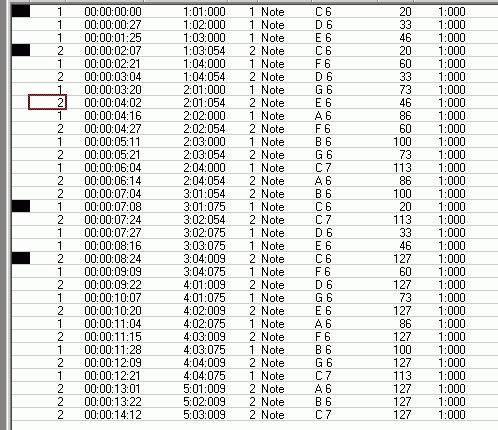
Changed notes
However, the note duration cannot be corrected this way.
The note duration correction comes from variant 1.
13. Copy tracks (copy events from multiple tracks) and move tracks (slide)
Tracks are copied or moved along with their events.
Therefore, there is no difference between copying and moving events and copying and moving them.
Track 1
Tracks 1 and 2 should be copied (doubled).
Events,
Tempo Information,
Key Information.
Track 2
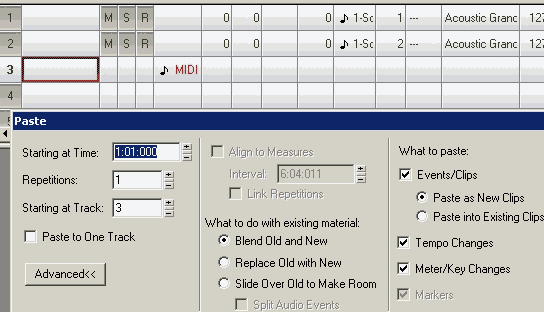
Zielspur, aber der hineinkopiert wird, einstellen.
Important: The playback cursor in the sequencer must be at the beginning of the track so that the
data is inserted (duplicated) from that point.
Then paste.
Track 3
Copied tracks.
The track number is copied. This creates a duplicate.
However, if the track numbers are changed, new tracks are created.
Track 4
Due to changes in track numbers, separate tracks are created that previously had identical content.
Each track is assigned its own instrument. Therefore, the tracks are no longer identical in pairs.
Adjust pan.
Track 5
Shift the content of MIDI track 3 120 ticks to the right.
Track 6
Shift the content of MIDI track 4 120 ticks to the left.
Since the shift is to the left, there must be space on the left into which it will be moved. Therefore, the track
must not be selected from the beginning, as otherwise no free space will be available: The sequencer does not necessarily
recognize that there is free space before the first event in the track.
Track 7
_________________________________________________________________________________________________________________________________
_________________________________________________________________________________________________________________________________
MIDI and Surround 7.1
Processing stereo or mono MIDI data into a surround format like 7.1 is only possible with
additional software that requires appropriate resources.
There are elevated hardware and software Requirements; please refer to the "Requirements" section.
Process for generating 7.1 surround PCM (7.1 WAV)
The MIDI file is created in a sequencer and mixed in stereo, as usual.
The MIDI file is played back via the sequencer and recorded (sampled) using software such as
Yamaha Steinberg WaveLab; the software's sample settings must match the sound card's
capabilities (e.g., sampling to 24-bit/96 kHz PCM for AVCHD compatibility, provided both
the sound card and software support these specifications).
The higher the sample rate and bit depth, the better the resulting recording-provided the speakers
are also of high quality (e.g., capable of reproducing frequencies up to 32 kHz). MIDI natively
supports only stereo (or mono). The recording master level must be set to ensure there is absolutely
no distortion during MIDI playback (check the mixer settings!). Even if the sound card offers
built-in hardware effects, it is best to avoid using them and instead sample the "direct signal";
this allows for greater flexibility when selecting effects later, making it easier to achieve the
desired sound.
The sampled PCM file must be normalized within the software. This process calibrates and adjusts
the level across the entire file without introducing distortion. Normalization is essential for
making PCM files comparable. Note that WaveLab 12 Pro unfortunately uses the confusing term
"Maximum" instead of "Normalization."
The normalized, sampled stereo file is then ready for further processing. For example, in
WaveLab 12 Pro in conjunction with iZotope Ozone 12 Pro. This combination allows for interesting
effects to generate the surround signals.
0. Surround Sub
The source is the stereo PCM file sampled from MIDI signals.
The target is a mono PCM file rendered exclusively via the subwoofer.
It is important to note that a subwoofer can also reproduce frequencies
from the mid-range, resulting in more authentic bass quality.
Therefore, a subwoofer should excel not merely in terms of size or
wattage, but above all in its playback frequency spectrum.
This means the sub signal must contain mid-range frequencies,
while higher frequencies are omitted, as the subwoofer
cannot reproduce them.
Consider this: If the speakers-for the Front Right and Front Left channels,
for instance-are not tower speakers but resemble desktop or bookshelf
speakers (few manufacturers offer high-quality bookshelf speakers
capable of reproducing frequencies up to 45 kHz), then the bass
must come solely from the subwoofer, which requires an excellent
signal derived from the mono PCM file. Vintage speakers-such as
those from Canton-might be suitable. A vintage Technics stereo
amplifier. Copper cables of the highest possible purity. All copper
cables cut to the same length.
Consequently, one must patiently experiment with the settings in
WaveLab and Ozone to generate a consistently high-quality sub signal.
The specific filters used-and their combinations-thus remain the
trade secret of the artist converting MIDI to surround sound.
Processing must be carried out at the same quality level as the
source file (i.e., 24-bit at 96 kHz). The goal is a mono file with a
filename that clearly identifies it as the sub channel.
7.1 PCM supports only one subwoofer.
1. Surround Front Left and Right
The source is the stereo PCM file sampled from MIDI signals;
the target is the stereo PCM with the left channel designated for "Left" and
the right channel for "Right."
The stereo signal must now be adjusted, for example, using iZotope Ozone:
The entire frequency range must be covered during this process. Mixing the
stereo signal should be done using a high-quality stereo amplifier and
high-quality tower speakers, with bass and treble settings kept within
the standard range. The balance must, of course, be centered. No
sound-altering effects should be used. The amplifier and
speakers must be impedance-matched and ideally capable of
reproducing frequencies up to at least 32 kHz, because timbre
results from a combination of overtones that are not individually
audible (human hearing extends to approx. 22 kHz) but are perceived
as a blend-specifically, as timbre. This must be taken into
account during mixing.
Reverb or other effects can be mixed in if desired. Here, too:
The filters used and their specific combinations are trade secrets
of the artist converting MIDI to surround sound.
Processing must be carried out at the same quality level as the
source file (i.e., 24-bit at 96 kHz). The resulting stereo file must then be
split into two mono files: the left channel becomes Front Left, and the
right channel becomes Front Right.
2. Surround Center
The source is the stereo PCM file containing the Left and Right channels.
The target is the mono file for the Center channel.
To achieve this, the Left and Right signals must be combined to create
an attenuated signal that serves a single function: subtly
supporting the Left and Right signals. The mono signal must
therefore be a superposition of the Left and Right channels,
which is then attenuated so that it is heard only indirectly.
Again: experiment patiently. The filters used and their specific combination are
a trade secret of the artist converting the MIDI to surround sound.
Processing must be carried out at the same quality level as the source file
(i.e., 24-bit at 96 kHz).
3. Surround Side Left and Side Right
The source is the stereo PCM file generated from MIDI signals, not the PCM file
used for Front Right and Left.
The target is a stereo PCM file with the left channel assigned to Side Left and
the right channel to Side Right.
This stereo signal must enhance the sense of spatiality perceived by the listener.
Again, patience and experimentation are key. The filters used and their specific
combination are a trade secret of the artist converting the MIDI to surround sound.
Processing must be carried out at the same quality level as the source file
(i.e., 24-bit at 96 kHz). The resulting stereo file must then be split into two
mono files: the left channel becomes Side Left, and the right channel becomes
Side Right.
4. Surround Back Left and Back Right
The source is the stereo PCM file generated from MIDI signals, not the PCM file
used for Front Right and Left.
The target is a stereo PCM file with the left channel assigned to Back Left and
the right channel to Back Right.
The listener perceives this stereo signal only indirectly, as human hearing is
naturally less sensitive to sounds coming from behind. Nevertheless, a sense of
spatiality can still be created. Higher frequencies are also important for
maintaining the correct timbre.
Again, patience and experimentation are key. The filters used and their specific
combination are a trade secret of the artist converting the MIDI to surround sound.
Processing must be carried out at the same quality level as the source file
(i.e., 24-bit at 96 kHz). The generated stereo file must then be split into two
mono files: the left channel becomes Back Left, and the right channel becomes
Back Right.
5. This results in mono files that share identical 24-bit/96 kHz specifications
but contain different audio content, thereby creating a sense of spatiality.
6. Converting the 8 mono files into 7.1 PCM
There are quite a few manufacturers whose software has never supported
creating 7.1 surround sound-Adobe Audition, for instance, only supports 5.1.
7.1 surround systems are a rarity on the market. The average consumer
settles for 5.1-which offers a less immersive spatial experience-or
dreams of unaffordable 11.2 systems, Atmos, and other purely
consumer-oriented luxuries.
In this context, the AVCHD format stands out as the only freely usable
format for Blu-ray. Alternatives like Dolby or DTS are either
outdated or prohibitively expensive.
7.1 PCM supports up to 24-bit audio at 96 kHz. By comparison, AC3 is
limited to 16-bit at 48 kHz and a meager 448 kbps.
Generating 7.1 PCM requires specific software, such as Sound Forge.
Originally developed by Sony, it was sold to Magix, which subsequently
sold it to BorisFX. The software is capable of processing 7.1 audio.
In Sound Forge, you create a blank 7.1 surround file and then populate
it with the 8 mono files. The required channel order (from top to bottom)
is: Front Left, Front Right, Center, Sub, Back Left, Back Right,
Side Left, Side Right. This is the only sequence implemented in the
7.1 PCM system. Sound Forge also offers effects that can be applied
synchronously to the mono tracks-for example, to adjust the overall
reverb. To render these effects, you need a CPU powerful enough to
handle error-free real-time monitoring. Storing the 8 mono files within
the 7.1 PCM file results in a total size eight times that of a single
mono file-or four times the size of a stereo file. A 5-minute clip requires
approximately 0.6 GB. This explains why AVCHD on Blu-ray is used as the
storage medium; backing up the individual mono files and the source file
alongside it easily pushes the total size to 1.4 GB.
7. Playback of 7.1 PCM
You don't necessarily need CyberLink PowerDVD. VLC Player works
too, provided it can communicate with the sound card. The player
sends surround data to the sound card, which requires a compatible
driver installed in the operating system. If you want to add
effects during playback, however, you might opt for software
like CyberLink.
8. The 7.1 surround playback system
The system should be high-quality and feature tower speakers.
The center speaker should also be substantial.
A modern AV receiver - such as one from Denon or Yamaha - can
handle video processing as well. This allows you to watch an
AVCHD disc with menus while the receiver processes the
7.1 PCM audio.
The 7.1 system must be properly configured: the listener's
position needs to be calibrated within the system. Controls
for adjusting channels, as well as bass and treble, should
be available. The subwoofer must also be adjustable.
Anyone hoping to use a 4K UHD player to play the AVCHD Blu-ray
while passing analog signals to the 7.1 surround system will
be disappointed: analog RCA connections are virtually
non-existent on the market now. Support is focused on HDMI
and eARC-a topic in itself when selecting a 7.1 surround system.
Anyone interested in further information should contact the author
of this website via email.
9. Creating a 7.1 AVCHD disc (Blu-ray format)
24-bit, 96 kHz PCM audio must be used.
The AVCHD menu structure can be created using various programs -
such as the freeware "multiAVCHD," which delivers simple yet
solid results and allows for layout customization.
You cannot use DVD authoring software, as the DVD format
does not support 7.1 audio.
For burning, you can use freeware like "ImgBurn," provided
you select the UDF file system-which is mandatory for
Blu-ray discs-since it manages data using a structure
different from that of DVDs.
If you are interested in learning more, please email the author of this website.
10. Creating AC3 5.1 audio
The AC3 file must use the following format: 16-bit, 48 kHz, 448 kbps.
The AC3 format does not support 7.1 audio.
Therefore, the mono files you have created-except for the "Side"
channels-must be converted to this format and then imported
into AC3 freeware (such as "Enc Wave To AC3") to generate
the AC3 file (multiplexing the mono files into AC3).
If you are interested in learning more, please email the author of this website.
11. Creating an MP3
Standard MP3s have a maximum bitrate of 320 kbps. They support
up to 48 kHz stereo WAV input; thus, the resulting MP3 is stereo.
The Fraunhofer Institute, together with Thomson, once developed
a 5.1 MP3 format but unfortunately abandoned the business concept.
A Google search can still locate the Windows software (formerly
freeware) used to create these 5.1 MP3s, which offer quite
good quality. If you are interested in learning more, please
email the author of this website. Conclusion
12. Conclusion
Creating a 7.1 PCM track is complex only during the creation of the mono
channels-specifically when determining the right combination of effects - but
otherwise it is a tedious process, except for creating the MIDI file and
mixing it in the MIDI sequencer. And it is truly amazing how MIDI sounds
in 7.1 surround-it is a different, exotic world.
13. Tip
Anyone wishing to digitize their vinyl records should approach it the same way as
creating a MIDI file. Outstanding results can be achieved-for instance, hearing an
old Pink Floyd record suddenly ring out in 7.1 surround, even though such
possibilities didn't exist when the album was originally released.
Here is something that works exceptionally well: if you convert Queen’s
*Sheer Heart Attack* into 7.1 surround, you’ll have to hold onto your chair
while listening. It’s not just incredibly good hard rock from Queen; it is the best
of the best. The author of this website treated himself to this extraordinary
result. ... Stevie Wonder’s synthesizer music also sounds fantastic.
And the way the author’s custom software organ allows Johann Sebastian Bach’s
organ and string pieces-including the famous Toccata-to unfold gloriously in
7.1 surround is truly unique; it leaves you open-mouthed in awe: "My God!"
Hearing the string pieces arranged for organ via MIDI strongly suggests that
Bach composed for both piano and organ-even the string parts. After all, Bach
was a virtuoso on both the piano and the organ. The system of figured bass is
the result of composing at the organ and was subsequently applied to instruments
such as strings-though the organ version arguably remains unsurpassed: it simply
cannot be bettered.
Anyone interested in further information is invited to contact the author of
this website via email.
14. Complete example: MIDI to 7.1 surround
15. Downloadable Surround 5.1 AC3 samples (448 kbps, 48 kHz)
from samples, mixing, and conversion of a MIDI file into AC3 5.1
16. Downloadable 7.1 surround WAV samples (24-bit, 96 kHz)
from samples, mixing, and conversion of a MIDI file into 7.1 WAV (7.1 PCM)
7.1 WAV files are very large: 4 minutes is approximately 600 MB.
Therefore, the download cannot be offered.
17. Audible stereo examples (MP3 320 kbps, 48 kHz)
from samples, mixing, and converting a MIDI file into stereo MP3
Spaehre_320.mp3 (6 MBytes)

Spaehre_320.mp3 (3 Minutes, with 6 MBytes) ... (Mouse click starts and stops playback)
Abba_320.mp3 (11 MBytes)
Abba_320.mp3 (5 Minutes, with 11 MBytes) ... (Mouse click starts and stops playback)
BornToBeWild_320.mp3 (8 MBytes)
BornToBeWild_320.mp3 (4 Minutes, with 8 MBytes) ... (Mouse click starts and stops playback)
OWhatANight_320.mp3 (7 MBytes)
OWhatANight_320.mp3 (3 Minutes, with 7 MBytes) ... (Mouse click starts and stops playback)
WarumDennNicht_320.mp3 (8 MBytes)
WarumDennNicht_320.mp3 (4 Minutes, with 8 MBytes) ... (Mouse click starts and stops playback)
WildWestRambo_320.mp3 (8 MBytes)
WildWestRambo_320.mp3 (4 Minutes, with 8 MBytes) ... (Mouse click starts and stops playback)
AWitherShadeOfPale_320.mp3 (11 MBytes)
AWitherShadeOfPale_320.mp3 (5 Minutes, with 11 MBytes) ... (Mouse click starts and stops playback)
Willkommen_320.mp3 (9 MBytes)
Willkommen_320.mp3 (4 Minutes, with 9 MBytes) ... (Mouse click starts and stops playback)
_________________________________________________________________________________________________________________________________
_________________________________________________________________________________________________________________________________
Downloads
_________________________________________________________________________________________________________________________________
_________________________________________________________________________________________________________________________________
Legal Notice:
www.musicinmidi.com
Barnabas Xantis
99955 Thueringen
Germany